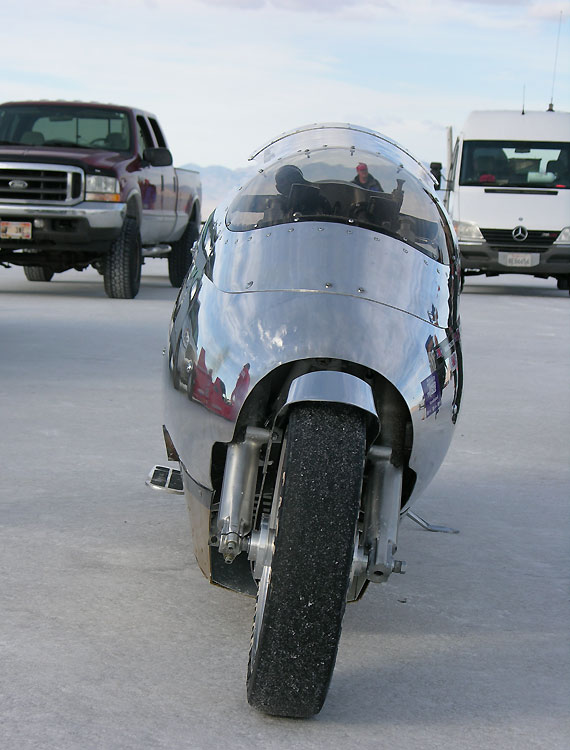
360 Hp 126" Turbo Orca Road Toad
Will You Ever Win...?
 ...Rhiannon..Stevie Nicks
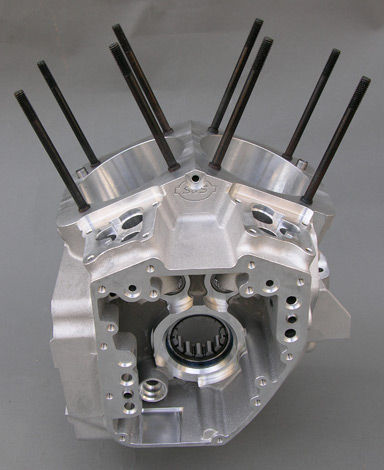
Stock Harley Twin Cam cases, rods and pistons...not to mention ancillaries like electronics, fuel system, final drives, clutches etc. are not sophisticated enough or strong enough for 300-400 horsepower. We're going to show you what it takes to make a Killer 126" ORCA Road Toad...in this case based on our 2004 FLTRI. It all starts with the foundation of the S&S SA engine cases with a 4 3/8" bore.
We should note these 126 Orca engines fit right into our 2004 FLTRI but do not fit the 2007 and later Touring and 2006 and later Dyna chassis...Just in case you were wondering. If you want a bunch of inches then a SE 120R engine with its big valve heads might be an alternative. You'd still have to take it apart and have it professionally prepared for turbocharging. Crank and bearing preparation, head sealing, pistons, piston pin, and other issues have to be addressed. Figure on doubling the cost of the SE 120R engine for labor and parts.
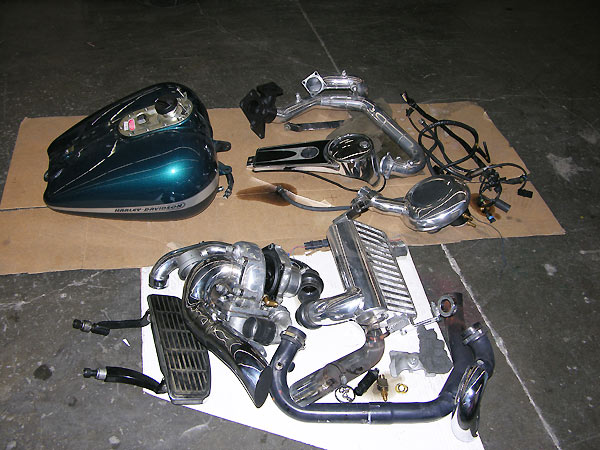
Parts
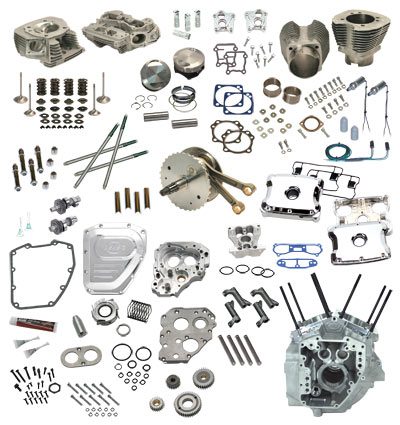
This
is $9,000.00 worth of parts from S&S. You might just notice that
this is just a bunch of parts and not an assembled engine. We don't use
all these parts and some of the items go to the shelf as they don't
work with turbos. Some parts we use come from our 139" Bonneville
Bullet which also has a 4 3/8" bore. Everything has to be proven.
Figure about $15,000.00 when we finish with it.
For those of you who have more money than common sense...or if you are just like us and want to follow our ORCA Engine dictum of "Terror Nihilum" i.e. "Fear Nothing", these packages will be available.
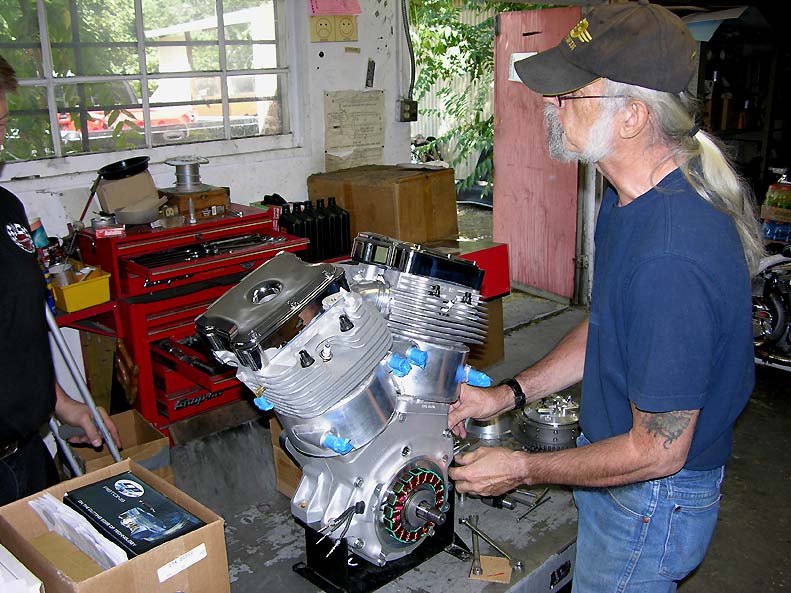
Follow Carl Pelletier of Competition Motorcycles as he assembles a 126 ORCA Turbo Motor.
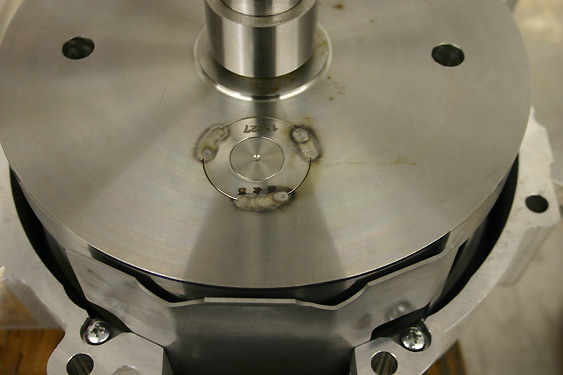
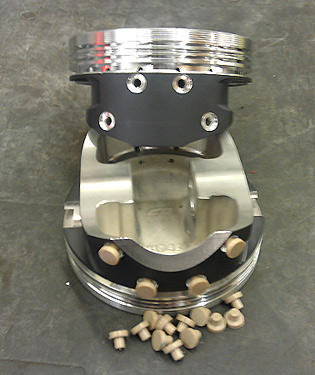
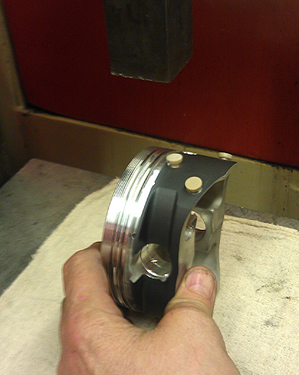
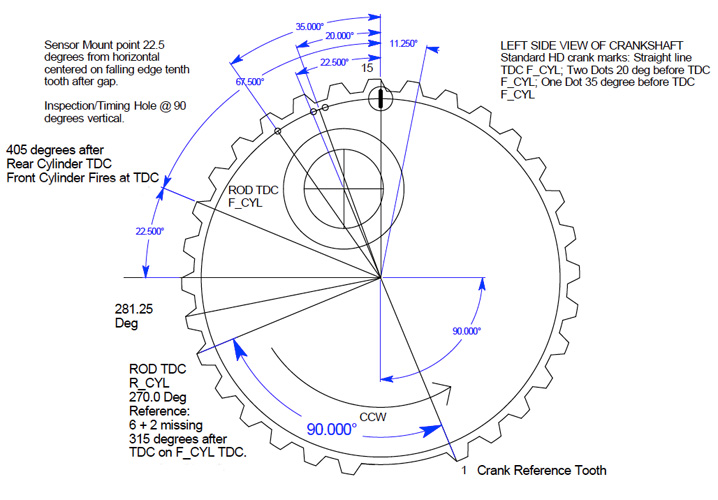
Crankshaft Preparation
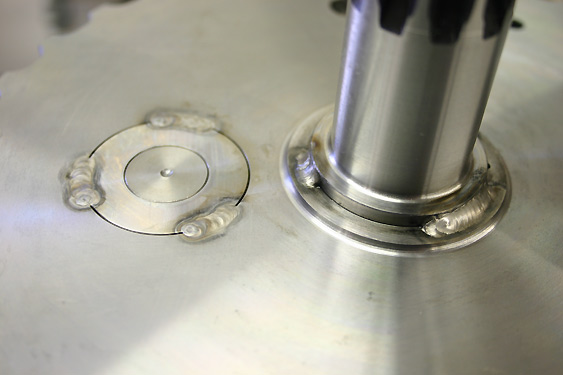
The S&S crankshaft is a five piece pressed together assembly with pressed in plugs...This won't do for a turbo. They come assembled because w you do not have the press to do the job.You have to weld the structure and keep it true within .001" runout. Not an easy job. Note the center pressed-in plug which is supposed to futher stick the main shaft to the crank wheel.
Stress and movement everywhere. It's a
miracle these things stay together. 1.5" crankpin v. a 2.375" Chrysler
Hemi and a 5 piece crank v. a one piece crankshaft.
Turbos
are easier on cranks than are Nitro burning dragsters, but shock
loading by dumping the clutch and banging the gears in race situation
can cause the crank to shift with less than favorable consequences. If
you are at all familiar with OEM Twin Cam crankshaft troubles you
already get the message. Harley has piles of dead Twin Cam cranks...the
cost of cost savings.
Unlike the previous 80 years of history
crankshafts and rods are no longer serviced, repaired or assembled at
the dealer level. Crank and rod assembies are simply replaced. Bye,
bye, truing stands and 500 lb 3/4" drive torque wrenches. Hello parts
replacers. At Harley suppliers big automated presses squeeze these
together and you cross your fingers.
Turbo Piston Preparation

We have custom CP turbo pistons with thicker domes and related ring packs for the higher turbo pressures. Alan at Xtreme Performance Coatings treats the skirts and places a ceramic heat barrier on the piston crown. Unlike S&S, Carl symmetrically cuts the skirts for front / rear piston clearance to preserve thrust face area. S&S cuts the face of only one piston.
The cylinders must be final honed to the
piston size before the coatings are aplied as the skirt coatings are
sacrifical and not to be used in the dimensioning process.
Road Toad Orca Pistons
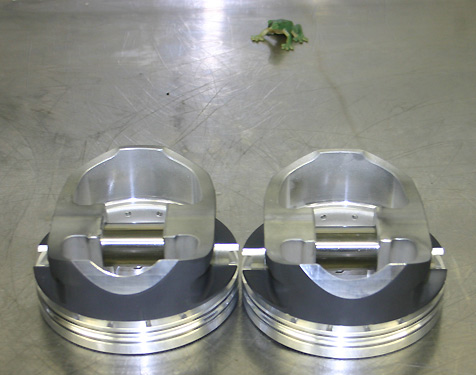
Cut symmetrically and balanced within 1 gram...these are ready for the next step. Piston pins are special heavy wall to prevent bending.
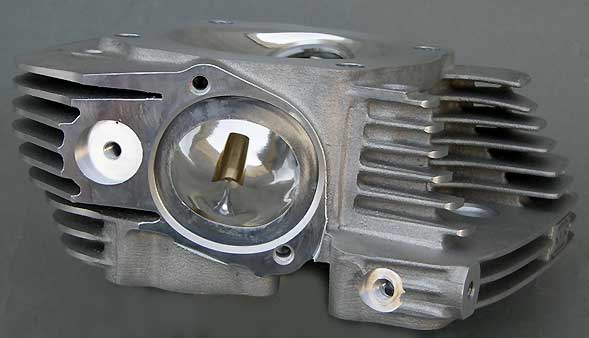
Cylinder Head Modifications
The S&S SA B2 cylinder heads get re-machined back to a static compression ratio of 9.6:1. With our specialized Turbo Camshafts the dynamic compression ratio is much lower. The 2.200" Inlet and 1.800" exhaust valves are retained. For extreme use like the 6 mile long course at Bonneville we use 1.800" 2400 degree Ferrea exhaust valves with thicker stems. For really high end horsepower like on our 139" ORCA Bonneville Bullett motor we have John O'Keefe at Branch O'Keefe do a turbo race porting job.
Full Turbo B2 Head Race Port...Branch O'Keefe
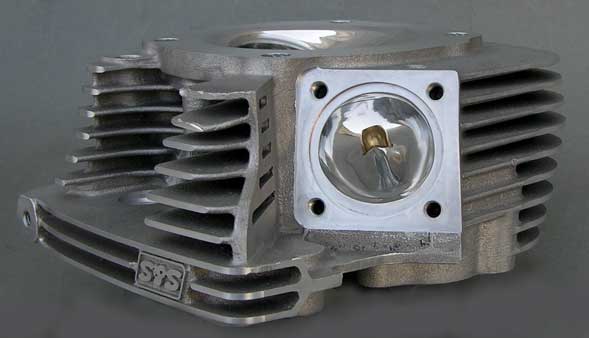
In
a race situation and you need to move 500 hp worth of air @ 30 psi of
boost this is what John O'Keefe will do to your S&S SA B2 heads.
Not necessary for the Road Toad, as it's a street bike, but
ever so necessary for Bonneville or racing. Branch O'Keefe Exhaust port
shown at the right.
The exhaust valves are upgraded to specially made Ferrea items. Full
race preparation is $1,500.00 which involves turbo porting, different
valves, guides and guide seals.
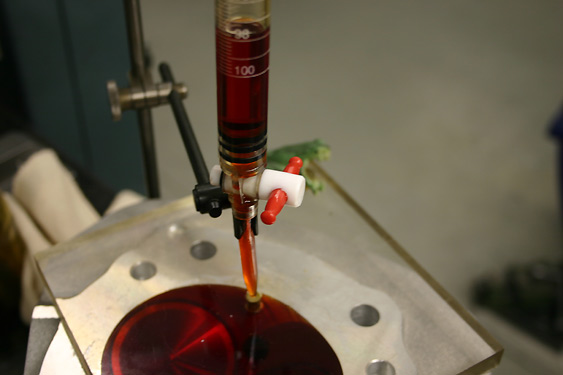
Branch O'Keefe Video Tour
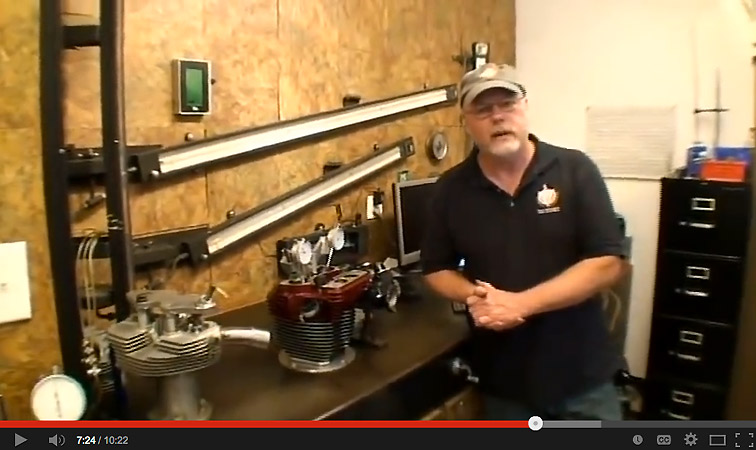
John O'Keefe does all our
cylinder head work. He and Jerry Branch have done all our race porting
since 1977. Jerry designed this 30 horsepower Supercharger-powered flow
bench which allows John to flow any depression he chooses...10", 12",
28" or 60". It's the most powerful flow bench in the industry.
They actually flow test and hand finish what they sell. Even at the
highest level of motorsport hand finishing and testing of each port is
required. Vagaries in castings makes 5 axis porting a time saver in
metal removal but not the answer for maximum performance. You still
have to hand finish and flow test.
Arguments about rough or polished ports is old history. At the microscopic level every surface is "rough". Jerry Branch is in the Motorcycle Hall of Fame for his accomplishments, not for talk. John and Jerry continue the tradition.
In addition, for race aplications,
pistons will be modified to take PEEK piston skirt buttons. There is an
additional cost for this.
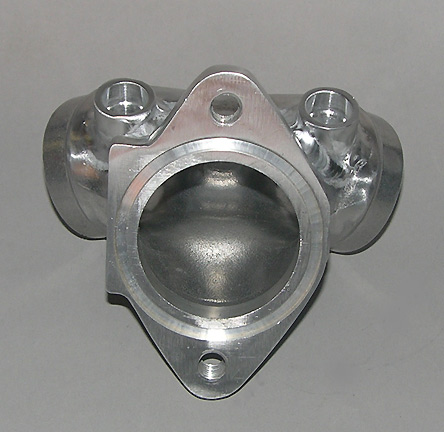
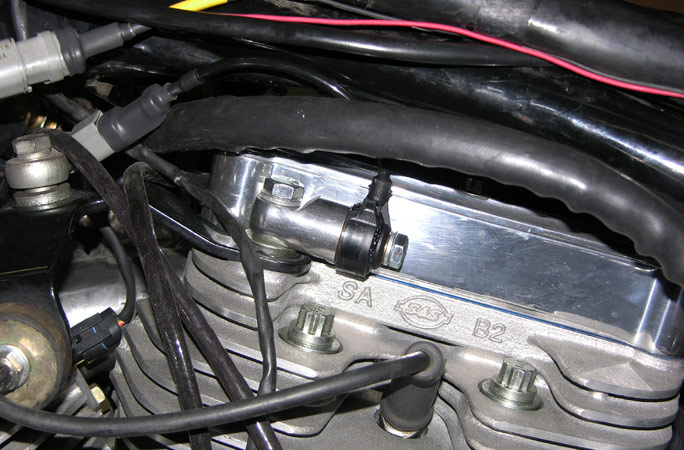
S&S SA B2 Heads...RSR EFI Inlet Manifold
The
126 Orca Turbo can be set up for 360 to 500 hp ratings depending on the
Turbo chosen and the boost level run. Stock Delphi type injectors
simply will not cut it. We use specialized injectors up to 2000 ccm or
24.0 grams per second. Stock Harley Delphi injectors are 3.91, 4.35 or
in the case of CVO injectors 4.89 grams per second. For the 360 hp 126"
Road Toad we will be using two 1000cc injectors (12 grams per second).
S&S SA B2 Oval Port Super D manifold modified for RSR Fuel Injection and RSR EFI 56mm throttle
body. After an intial run-in this was switched to Fly-By Wire...more fabrication.
No one said any of this is easy. The OEM in tank fuel pump must be changed as well as the fuel regulator. Neither was designed for 360 much less 500 hp.
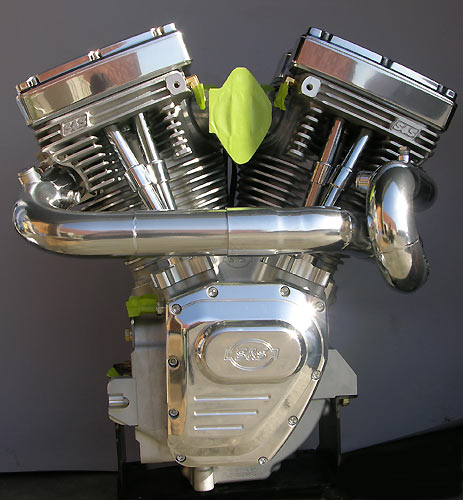
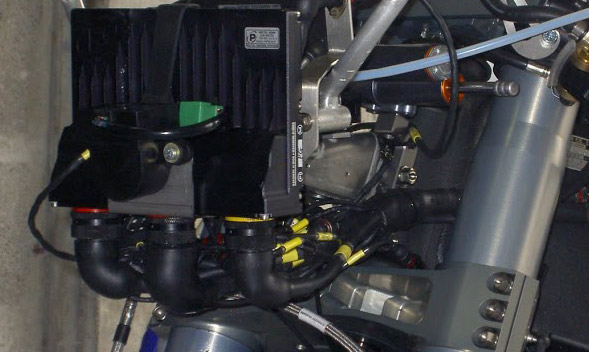
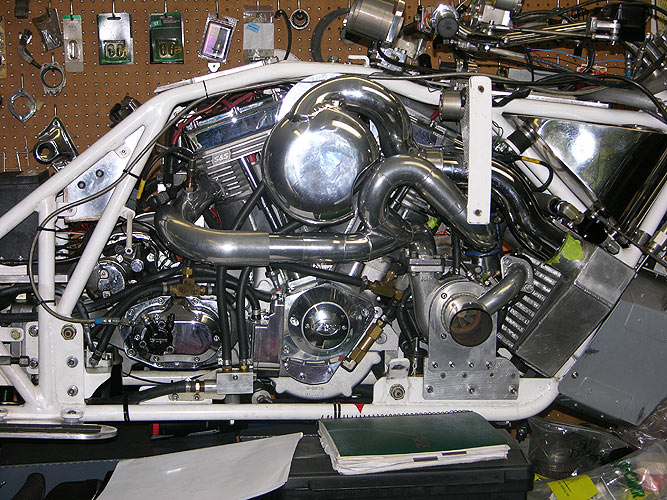
Completed Engine
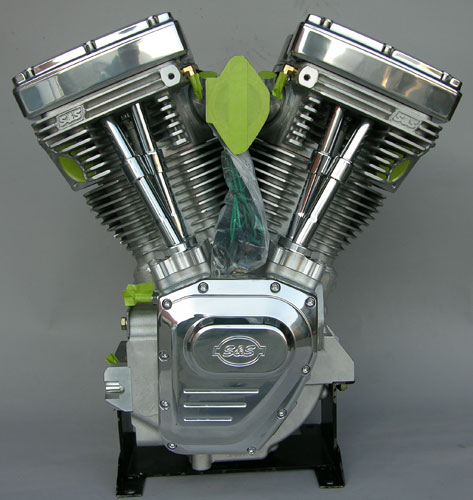
Here's the completed 126
Orca Turbo. The cylinder head is sealed with 600 psi nitrogen-filled
Inconel rings. The crankshaft is balanced and welded. The Combustion
chambers have been modified and cc'ed for turbo compression. Special 4
3/8" CP Turbo pistons with low friction skirt coatings and ceramic
barrier crown coatings. Special Turbo camshafts. 56mm RB Racing Inlet
Manifold set up for two 1000cc injectors. We don't dual plug these like
we do our 139" Orca Bonneville engines as the stock FLTRI chassis
doesn't allow access to a center chamber spark plug.
Figure $15,000.00 as it sits. Carl Pelletier completed the assembly with our custom parts. Next up is the specialized turbocharger hardware, the advanced electronics and mil-spec wiring harness and sensors.
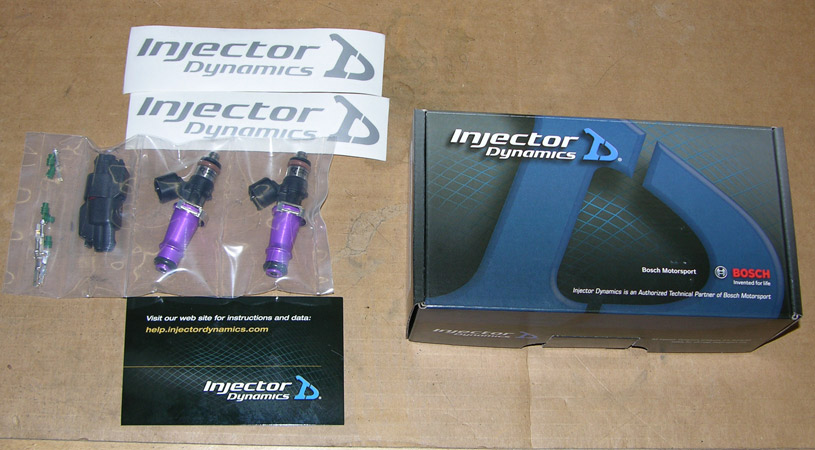
Injector Dynamics Injectors
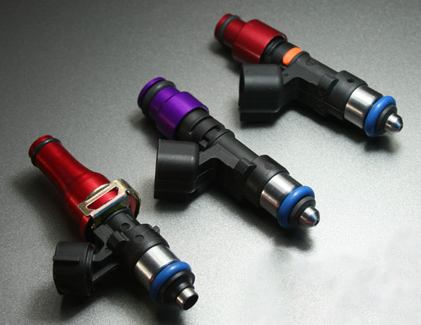
Tony Palo at T1 Race Development is the guy you go to for the most accurate racing injectors. If you want 1000cc or 2000cc injectors to idle properly and be linear across the operating range these are the only game in town. They are relatively inexpensive for what they do and as you venture into more complex engine management systems with all sorts of offset tables, individual cylinder trims, and the like, then you better have an injector that comes with a pedigree and a flow chart.
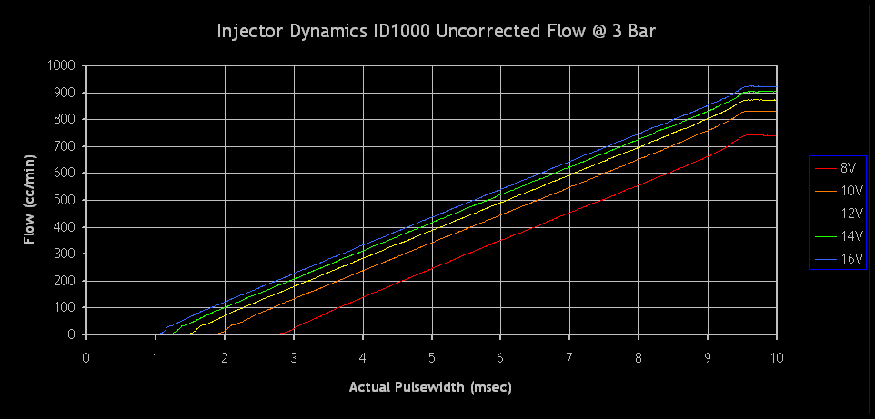
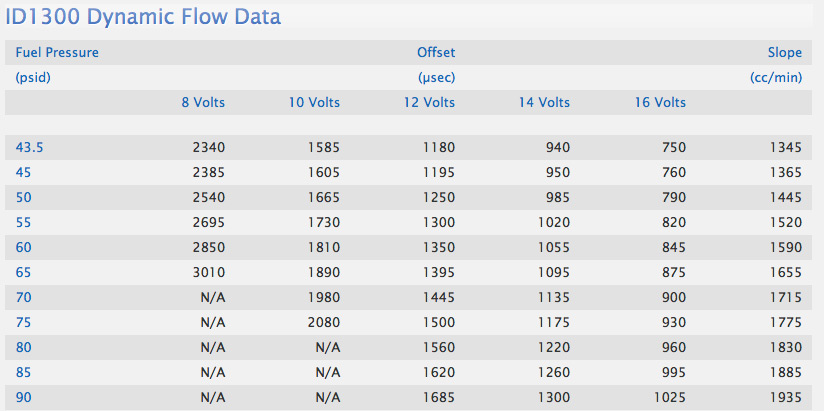
Here we have the ID1000
Injector Dynamics 1000cc Injector flow chart for different voltages. In
more advanced engine management systems you have voltage offset tables
to insure your fuel flow remains constant at programmed values.
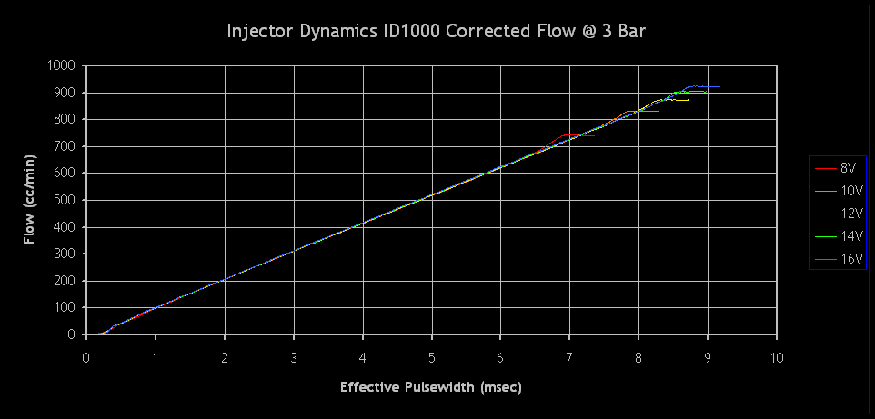
Here the same injectors have been reflowed with a Motec controller with the proper voltage offsets or corrections programmed in. We are using ID1000 injectors in our 126 Orca motor and in the Fall will be running ID2000 injectors in Mike Geokan's Bonneville Bullett. Tony supplies the correction factors so you do not have to run a battery of tests on a flow bench to figure this out. We see more Injector Dynamics injectors at Bonneville these days...in everything from Enzo Ferraris to motorcycles.

We use AN6 fuel lines with
a full 1/2" bypass circuit over the injector feed ports. The ID1300
injectors are High Impedance 12 Ohm. There is no need for low inpedance
injectors. Fabricated billet hard-anodized fuel rail. External
regulator keeps the fuel pressure 55 psi above manifold pressure.
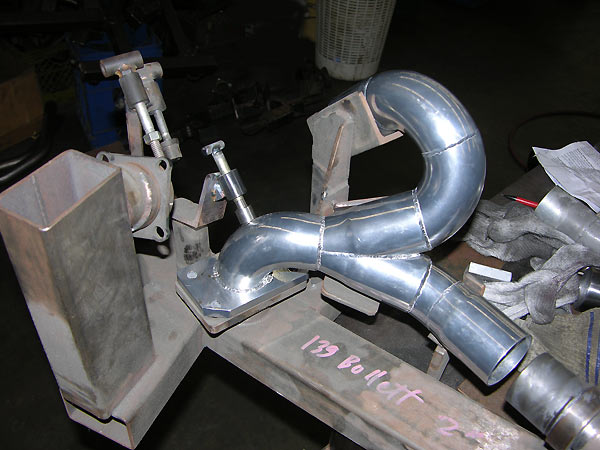
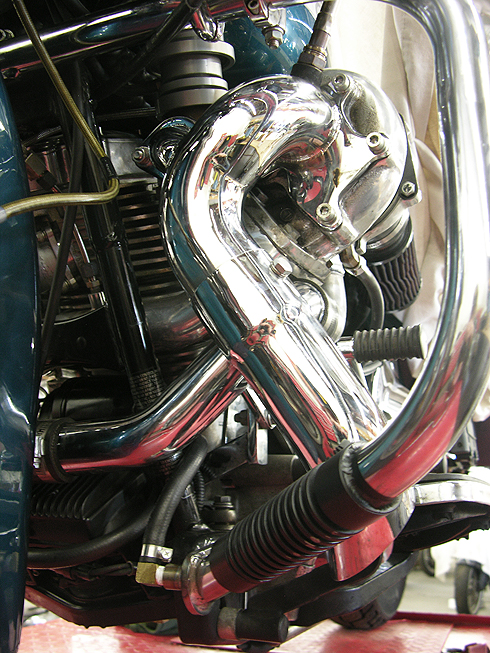
Turbo Exhaust Manifold
Life gets complicated when you have different engine deck heights and S&S SA B1 and S&S SA B2 cylinder heads on 126 and 113 Orca Motors....and when you have to make parts to fit FLT, Softail, Dyna and FXR Chassis. You get to deal with varying slip fit lengths, different engine and intercooler mounts, different plenum chambers and the list goes on and on. It does sort of help when you have S&S Supersport, S&S SA, OEM Evo and OEM Twin Cam engines as well as Softails, FXRs and FLTs in the shop. In the end you make specific items for the application and little can be used cross-platform.
Here a new set of fixtures has been made for the 126" SA B2 Twin Cam and 113" SA B1 Evo Orca motors. The 113 Evo is a taller engine and frame clearance issues get tight with a taller engine in an FXR. Prototypes are done in mild steel, tacked together, and then replicated in very expensive stainless steel with 2" tubing on 2" and 3" radii. CNC machined flanges and turbo venturis are specially made for the S&S SA B2 and S&S SA B1 cylinder heads. Fixtures are set up for dual O2 sensors and EGT probes.
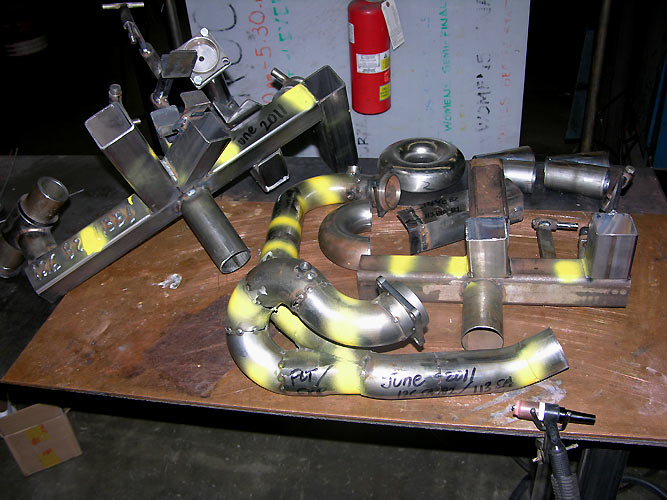
Stainless Exhaust Manifold

After we prototype the exhaust manifold in mild steel and make our fixtures we duplicate the parts in stainless steel just like we did for Mike Geokan's Bonneville Bullett. You are looking at about $700.00 worth of precision 2" O.D. 16 gauge stainless steel to make two headers. Figure two to three days of fabrication and it gets pretty pricey. If you make the parts very accurately, purging the tubes with Argon as they are welded, then you will have parts that will not fail. We do not use the tubes for any support function, only as a conduit for the hot expanding exhaust gases...typically 1450 to 1625 Degrees F.
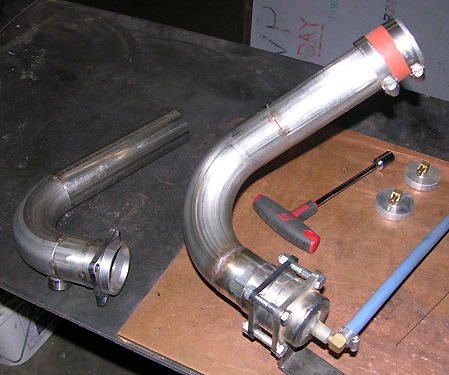
Added to the tubes are EGT ports, O2 sensor ports, and a port to measure exhaust backpressure for O2 corrections. Stainless holds the heat but the tubes will also be ceramic coated for additional heat retention.
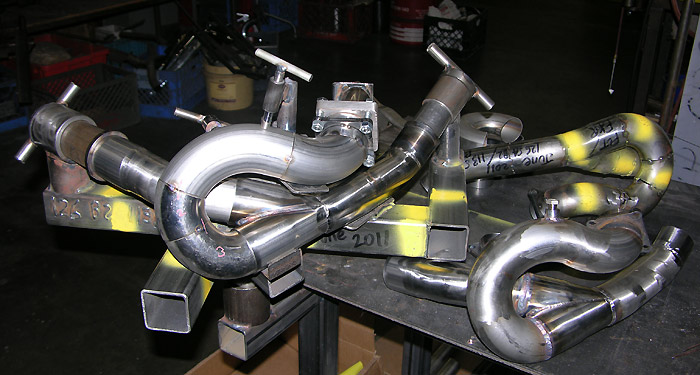
Two sets of 126 Turbo exhaust manifolds being fabricated in stainless. Tubes are purged with Argon for final welding. The parts will "pull" or shrink so there is a sequence to be followed or the parts won't fit. They will be final prepped with the O2 ports, EGT ports, Pressure ports and then taken to Alan at Xtreme Performance Heat Coatings for a Silver Ceramic finish. Good way to spend three days.
Pressure Compensation Port
![]()
On our 126 Orca the advanced electronics allow real-time, closed-loop, adjustments of the front and rear cylinder air/fuel mixtures under both vacuum and boost. The wideband sensors are placed on the pressure side of the exhaust near each exhaust port to monitor the front and rear cylinders. As the exhaust pressure rises the sensors will give false readings unless compensations are made. We add a pressure port that goes to a 0-5V 100psi pressure sensor so we can dial in the appropriate correction factors.
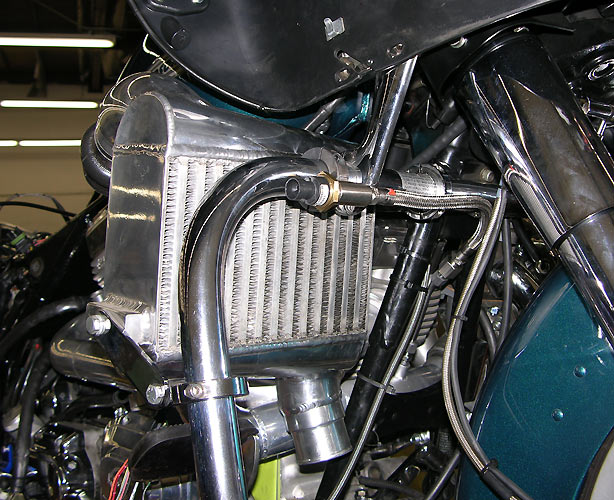
Ceramic Coating
After the stainless exhaust
has been made it gets a Silver Ceramic Heat Barrier Coating from Xtreme
Performance Heat Coatings.
It looks like polished aluminum and will turn grayish @ 1450-1600 Deg F
but won't burn off. Left alone, the stainless will turn gold, then
brownish, then black. The stainless 16 gauge tubing holds the
heat in very well...With the barrier coating even more so. Chrome heat
shields are placed over the exhaust manifold.
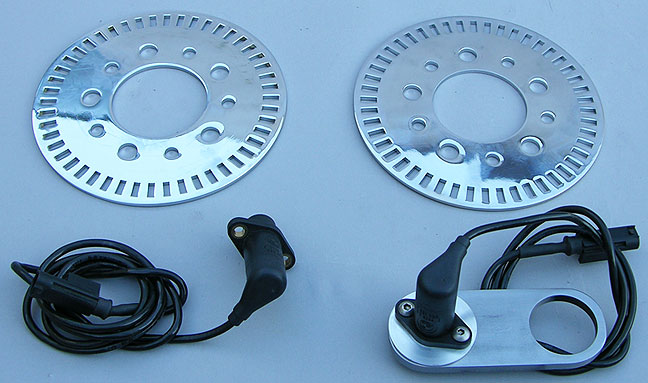
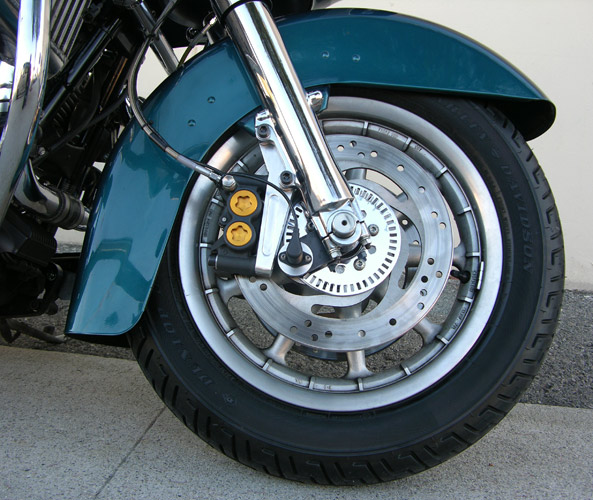
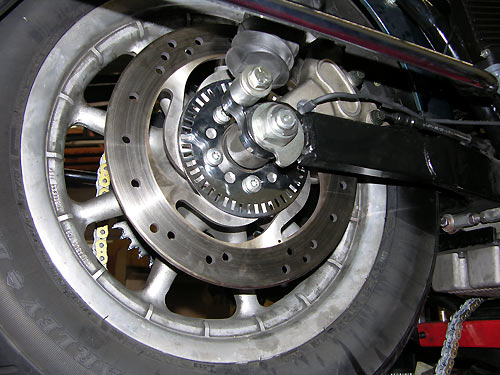
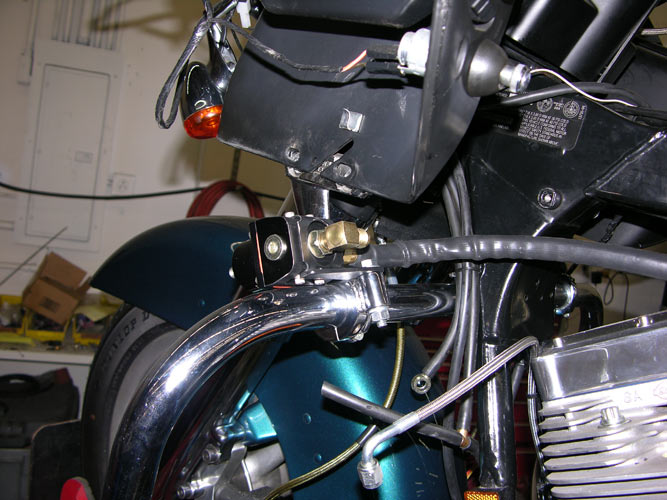
Radial Mounted 4 Piston Calipers
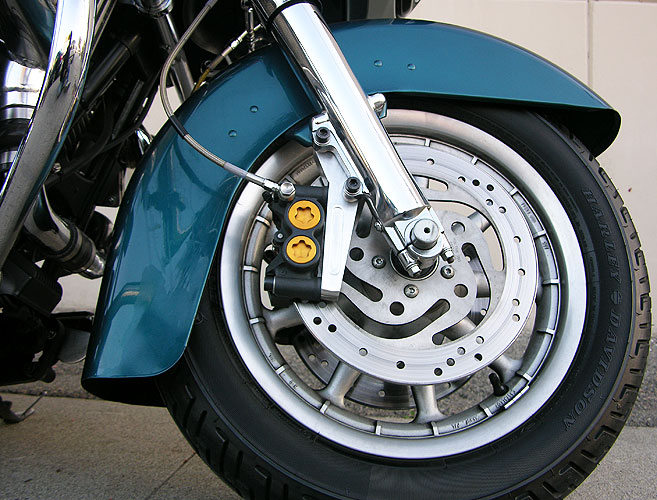
The stock Harley brakes never gave us the feel we wanted so we decided to do something about it. We did a lot of 24 hour endurance racing in the 1970's and our bikes always had the best brakes....usually AP Lockheed with Brembo "Oro" iron rotors. With the 126 Orca Turbo we decided to fab up a set of radial mount 4 piston calipers that were of one-piece construction. No flexing and we get a solid lever with far better stopping power. Brakes are what we call "reverse horsepower". Since we'll have more that 300 hp on tap we needed 300 hp rated brakes. Besides, they look trick.
The stock Harley 400 series
Stainless Steel rotors can't shed enough heat for repeated high speed
stops but they are OK for street use. Iron based rotors are better but
they rust.
While we were at it we also
upgraded the 2004 forks to some chromed 2008 units. The 2004 forks only
had damping in one leg...anything the MoCo can do to save a buck.
Chrome is worth at least 5 mph sitting still.
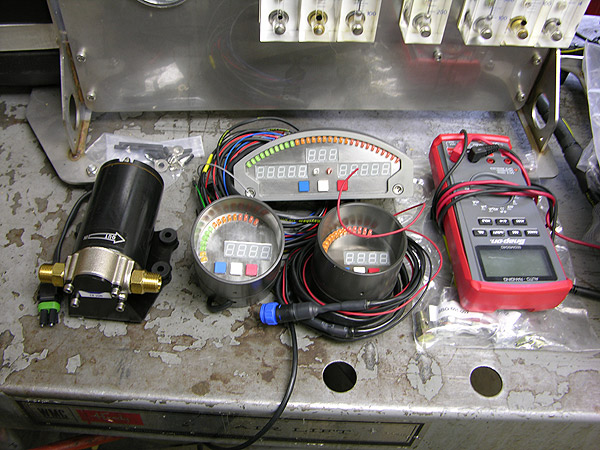
Mil-Spec ECU Wiring
The Road Toad 126 Turbo is getting a complete Mil-Spec Wiring Harness to match its upgraded high end electronics. We have provided an overview of Motorsports wiring to show what goes into making a racing wiring harness.
On the Road Toad we'll be looking at: throttle position, manifold pressure, fuel pressure, engine oil pressure, turbo oil pressure, exhaust pressure, front and rear O2 sensors, inlet air temperature, charge temperature, front wheel speed, rear wheel speed, gps, tachometer/engine speed, voltage, egts front and rear cylinders, knock sensor, and several other temperature readings. It does get complicated.
Stainless Steel Braided Oil Lines

We cover our RB Racing Turbo braided stainless steel oil lines in high temperature shrink tubing. We know you just love to see braided stainless steel lines but they get dirty, scratch everything they rub up against and tend to eat everything they come in contact with. Black is what you get.
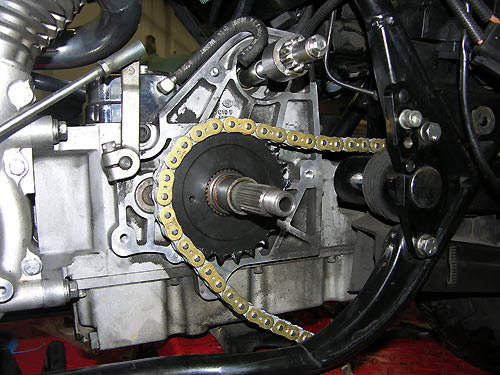
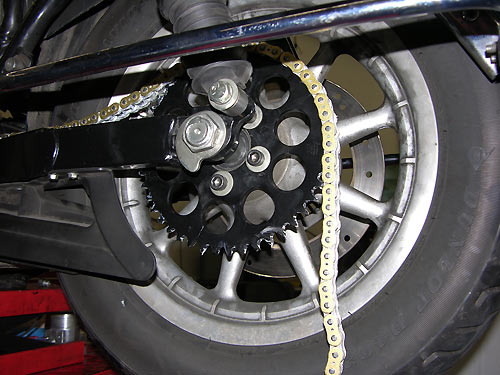
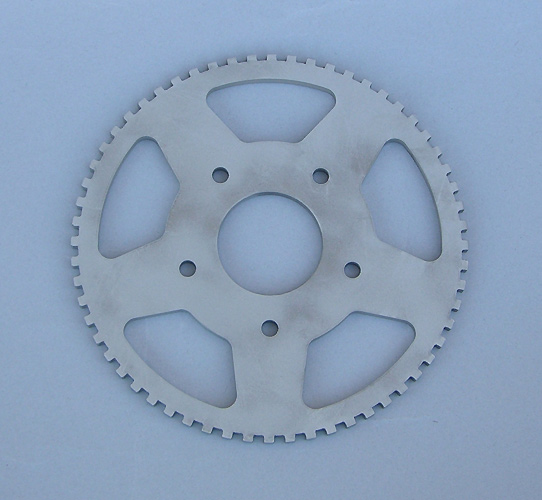
We converted the Road Toad to an EK 530ZZZ final drive chain, the same as we use on the Bonneville Bullett. A Baker Drivetrain 24 tooth transmission sprocket with a .200" offset and an anodized 45 tooth rear wheel sprocket lets us run the Road Toad up to a leisurely 180 mph without revving the 126 Orca Turbo motor too high. We geared it a tad taller so we can cruise at 80 mph well under 3000 rpm and get 50 mpg.
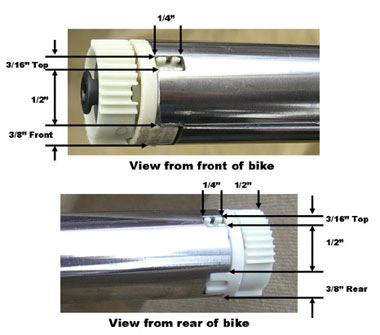
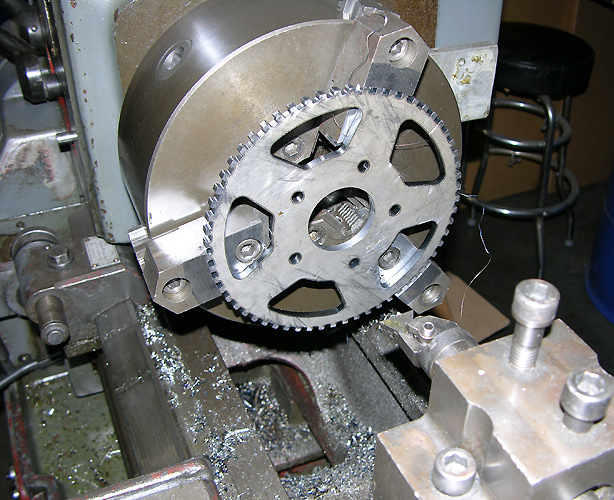
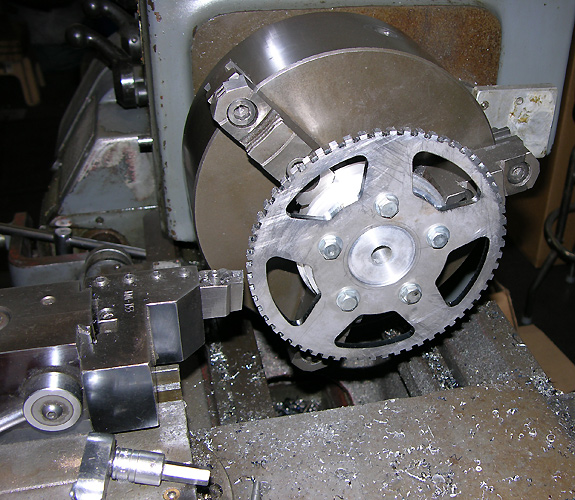
Adjusters
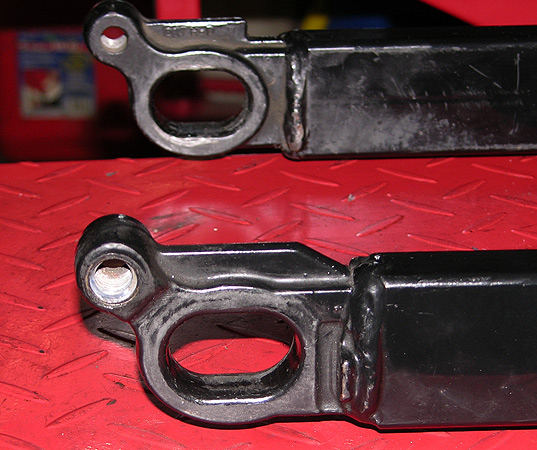
The oem rear axle adjusters with the eccentric belt tensioners only offer a total of 1/2" of adjustment which means setting chain tension with a sprocket is next to impossible. One tooth more or less and one link more or less and the chain simply cannot be adjusted. We revamp these so we can choose the gearing we want and be able to set the correct chain tension. The swingarm was designed for a specific belt and pulley combination, not for a chain drive.
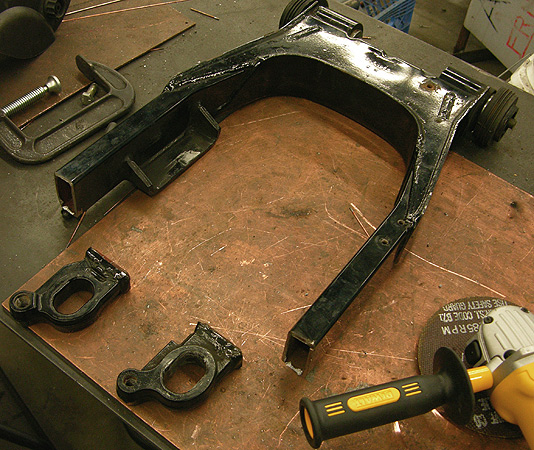
First step is to remove the oem adjusters. We use a fixture to weld on the new adjusters that we machine.
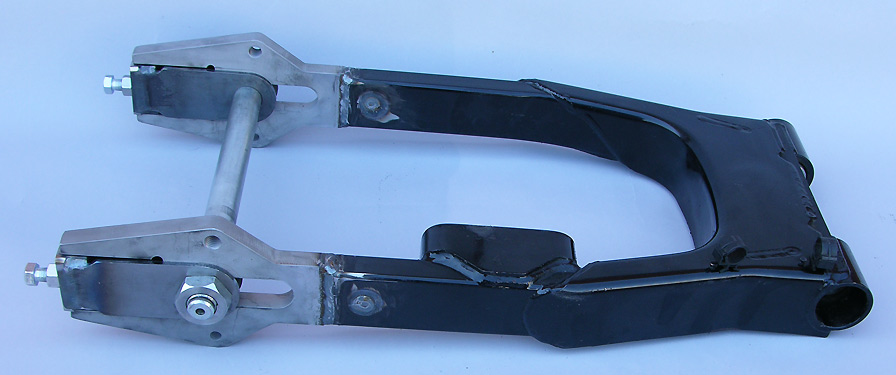
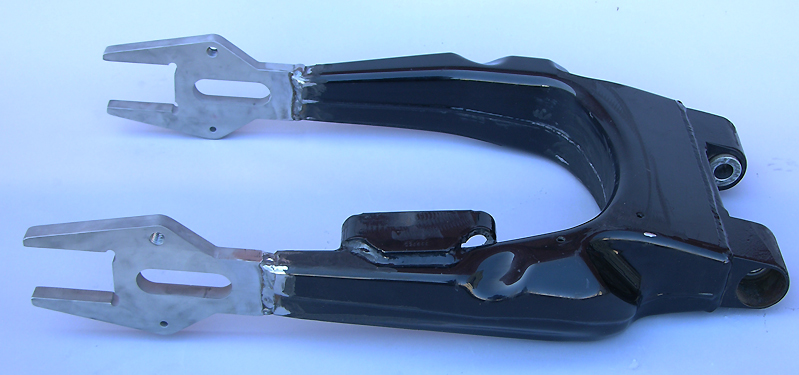
Machined Billet Adjusters are welded to the prepared swingarm in a fixture that locates all critical dimensions, allowing 2" of adjustment with stock shock location. Required for high horsepower RB Racing Turbos. Next step is to strip and re-powdercoat the swingarm. The sliding billet axle adjusters are cnc machined and chromed. A Swingarms can be done for clients who supply RB Racing their stock swingarm and rear axle. Late model cush hub models are more involved as the hub must be machined for the sprocket. On our 2004 Road Toad we bolt our 530 sprocket directly to the oem wheel.
Pictured above the axle is 1.5" further back than stock. Next step is powder coating and chroming.
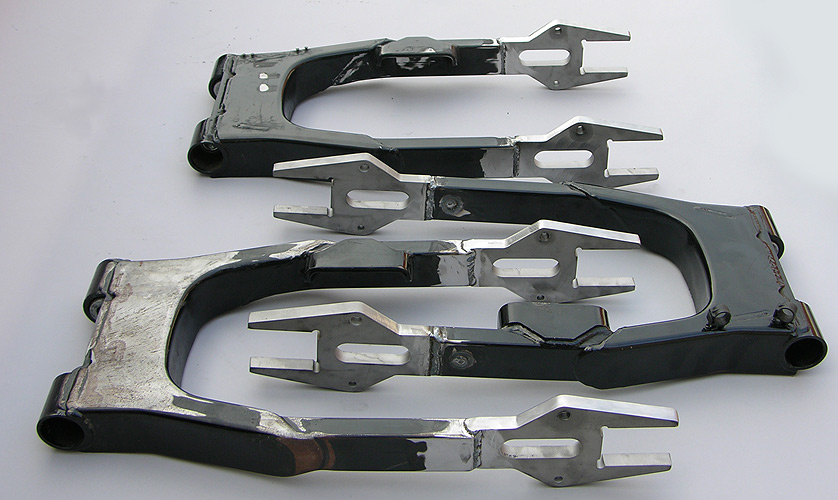
Three customer arms. Two for turbos and one for a Twin Cam S&S 124" with SA B2 heads that makes 150 hp. Go big or go home as they say.
The 2009 and later
swingarms are completely different. We have fixtures to convert these
to chain drive. Aftermarket wheels can be used with direct sprockets or
the cush drive mechanism can be machined to accept a sprocket. Chromed
adjusters below. We offer a service
to convert these to chain drive.
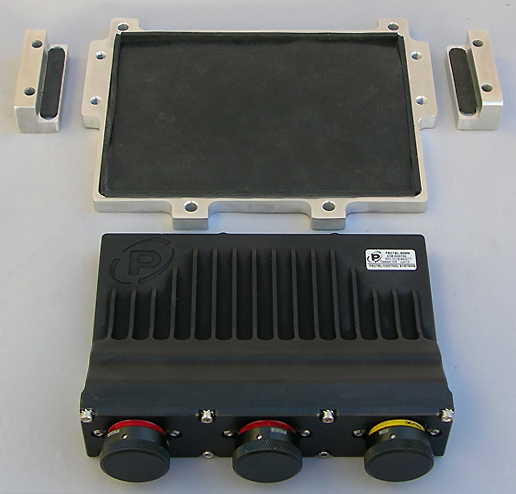
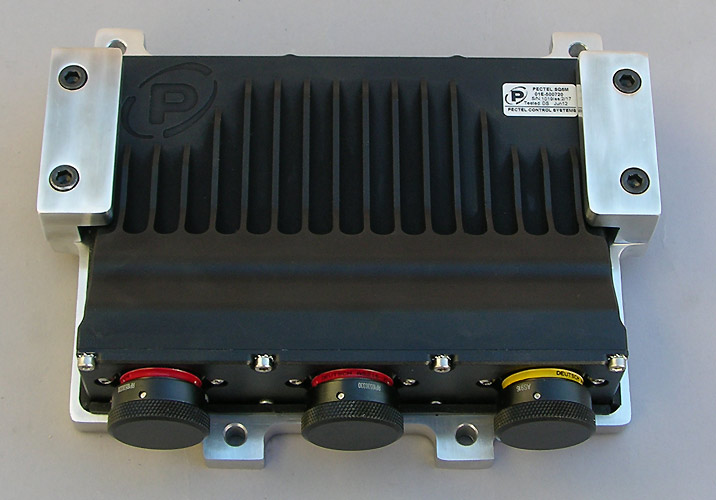
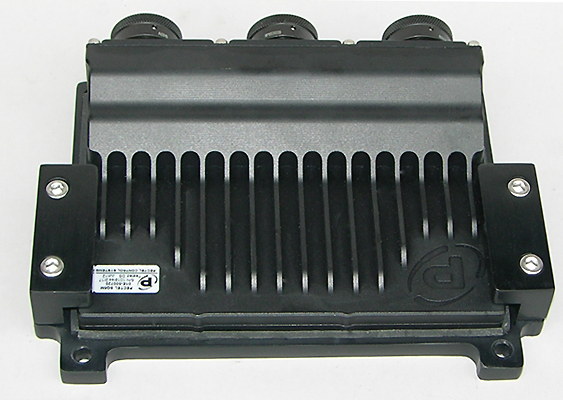
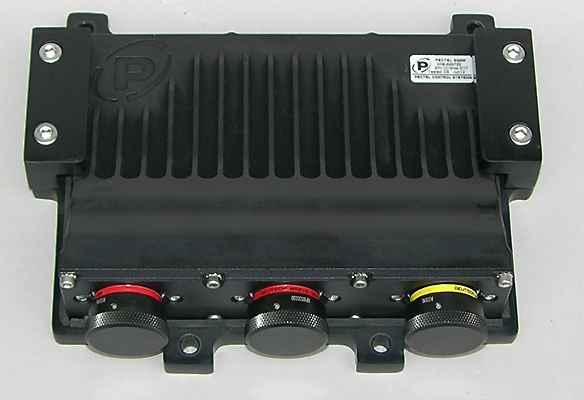
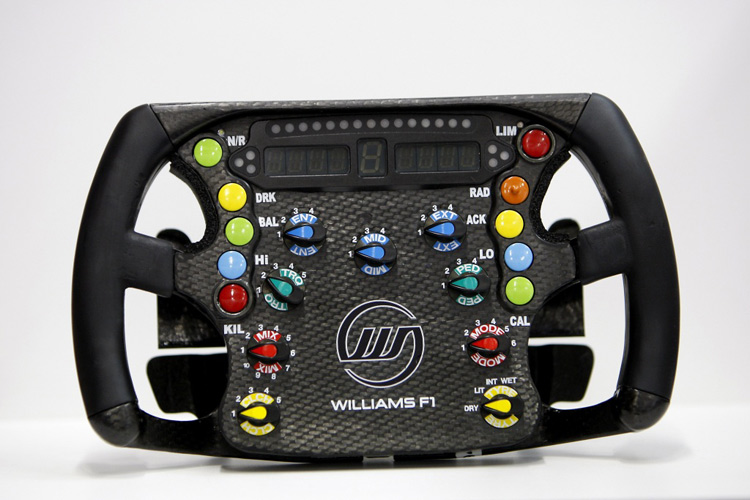
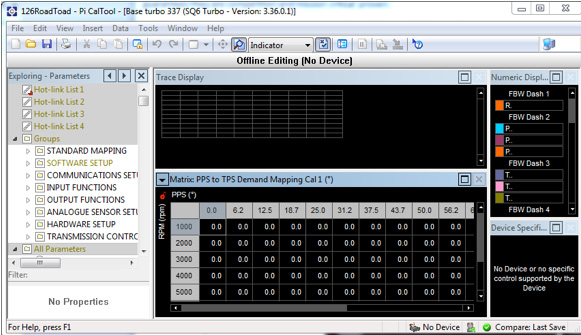
Advanced Electronics: Cosworth Pectel SQ6M
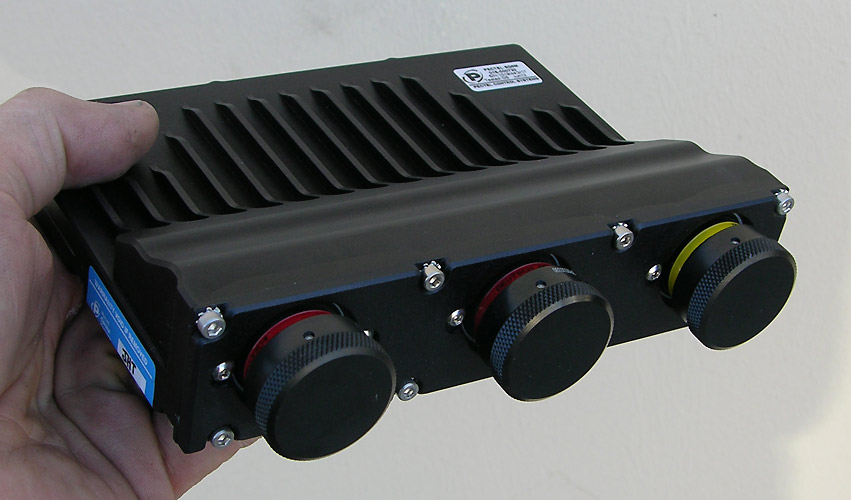
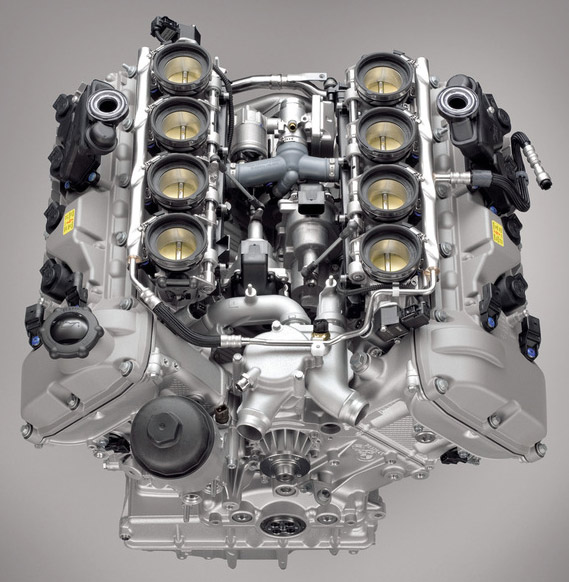
We used our own RSR EFI to set the first record with the Bullett and many other records since the early 1990's but we felt we needed to have more adjustability, processing power, feed-back mechanisms, and complexity to go for 250+mph. Besides, we get bored and love technology and what it can do for you. Pictured above the is the Cosworth Pectel SQ6M with it's pricey hardcore Deutsch Autosport connectors. Two 26 pin connectors and one 55 pin connector. Competition proven.
The SQ6M is used by the BMW Factory on their quad cam 4 liter racing V8 with its quad-VANOS variable timing system. Operated from engine oil pressure, this technology provides continuous adjustability of all four cams. The engine features a separate throttle butterfly for each cylinder, with two stepper motors operating them on each row of cylinders. This gives the BMW M engine a particularly sensitive response at low speeds together with an immediate reaction whenever the driver presses the accelerator. The prodigious power output – 420bhp at 8,250rpm – is carefully managed by a Cosworth Pectel SQ6M ECU.
Then we come along with
four pushrods and a couple of two valve cylinder heads. The SQ6M most
likely will not have to work too hard to run all the other functions
like cylinder timing, front and rear cylinder injection, boost control
and traction control. Well, if it's good enough for BMW, we might as
well take it to the Salt Flats.
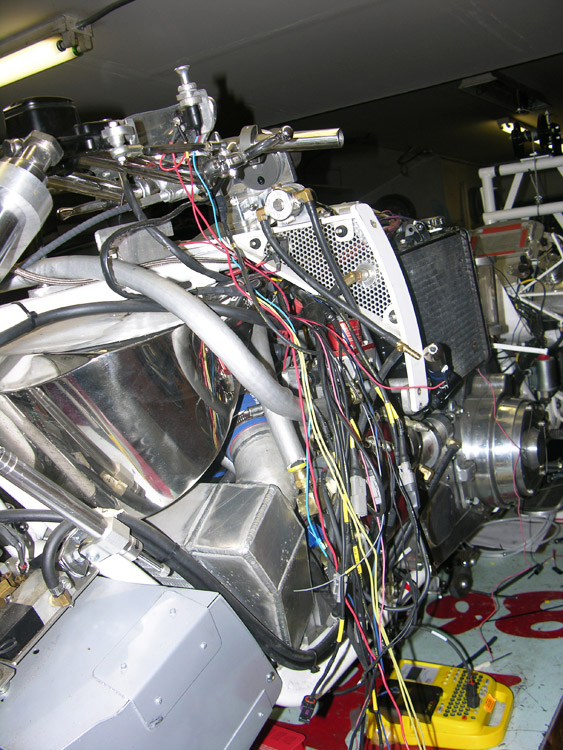
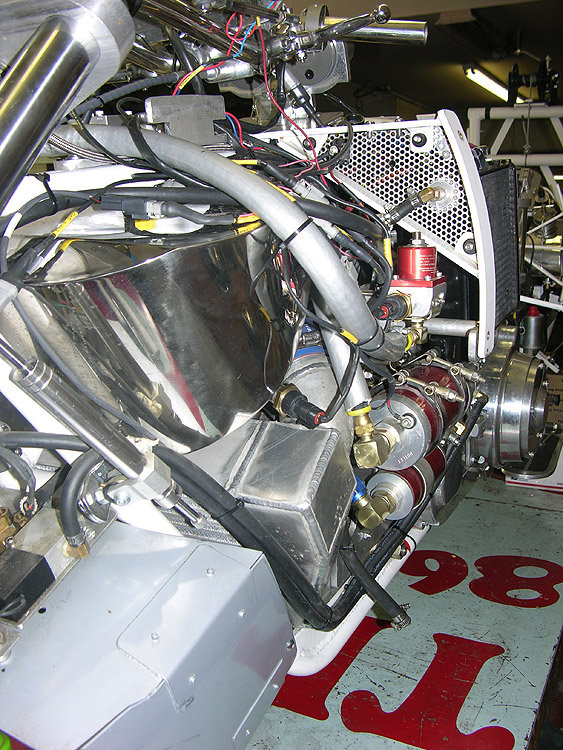
Mike Geokan getting ready
to install
the 139" Orca motor in the Bonneville Bullett in his shop in Boise
Idaho. The 126" Orca motor in the Road Toad allows us to street and
track test things before the Bullett runs at the Salt Flats. Both run
the same sensor packages and wiring. SQ6M with Deutsch Autosport
Connectors shown above.
Pectel SQ6M Mount
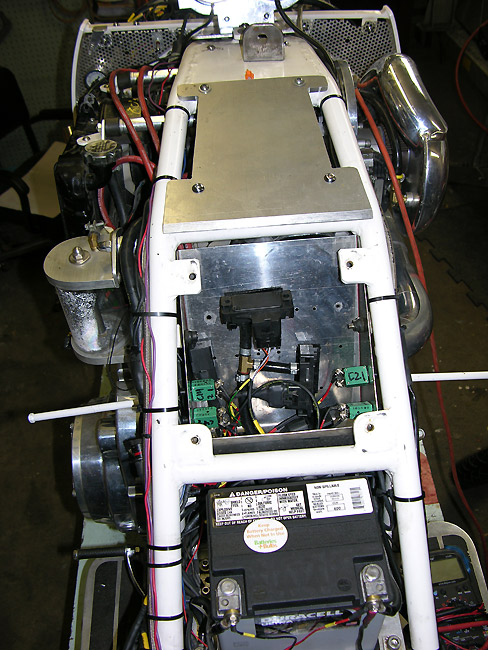
Mounting the Pectel SQ6M
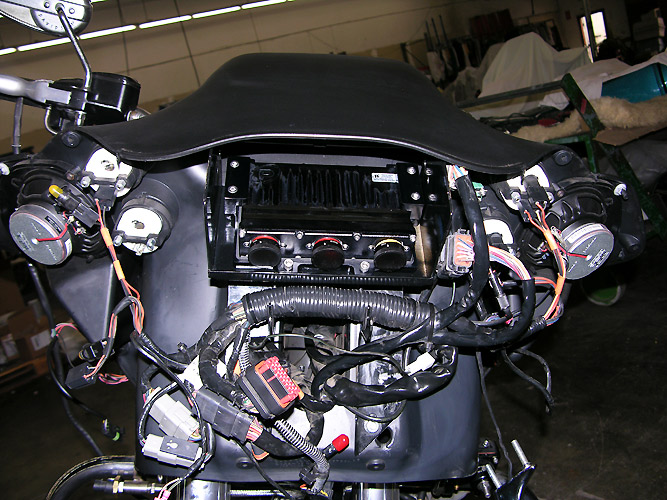
We found the perfect place
for the Pectel SQ6M inside the Road Toad's fairing.
Although the Mil-Spec wiring harness will be sealed, we prefer a
protected environment for the electronics. Four bolts (turn signals)
and six screws
and the Road Toad's fairing shell pops off. We machined and anodized an
aluminum
rubber isolated mount for the SQ6M and bolted it in the metal tray.
Oh yeah...The metal tray... That's where the radio was. We don't need no stinking radio...and the radio's faceplate opening becomes part of our new turbo dash.
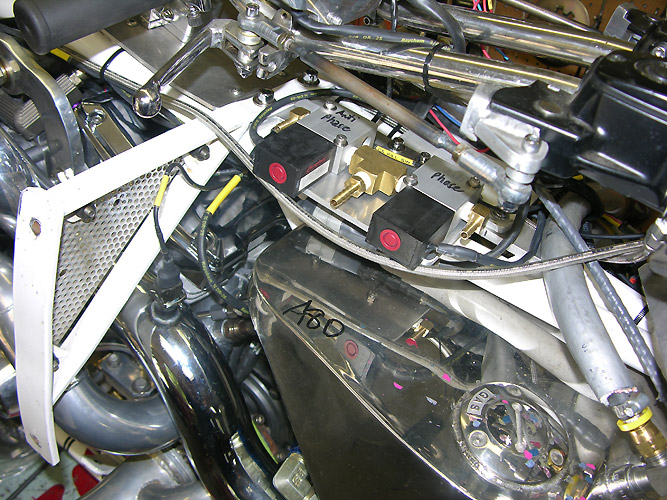
Pectel Anti-Phase Boost Control
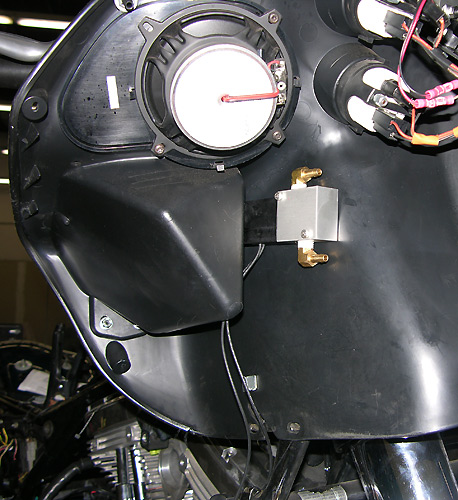
Using two fast-acting and quick-venting solenoids the Pectel SQ6M will control the boost pressure to both sides of the wastegate's diaphragm. Being able to quickly vent and pulse width modulate (PWM) the solenoids allows a very precise boost control. Gone is the old Dial-A-Boost venting pneumatic manual controller. Boost strategy gets tied into gear selection, traction control, and other factors including throttle position. Deutsch DTM connectors connect the solenoids to the SQ6M harness. We use 1/4" (6mm) efi hose for boost pneumatics as it does not kink, is highly durable and is high temperature (engine compartment) rated.
Throttle By Wire

These days FBW/TBW is pretty much the way to go and is a critical element in traction control and torque management strategies. The Pectel SQ6M comes standard with traction control and FBW capabilities. We use 60mm Bosch motorsport units on our Road Toad.
60mm Bosch
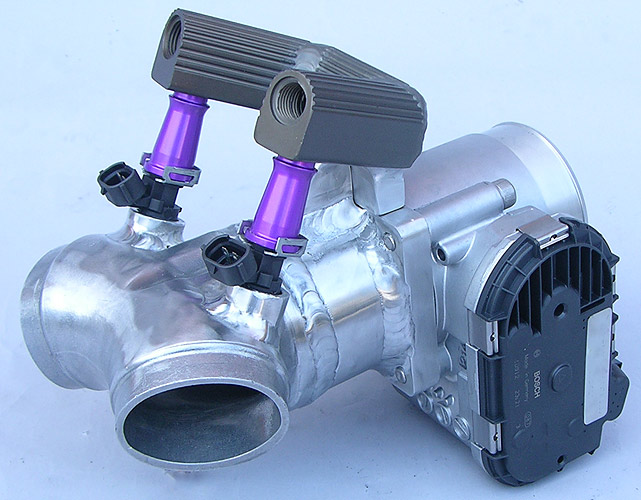
FBW/TBW Bosch throttle body for the SQ6M on the Road Toad. You have to fabricate this stuff. Gets expensive. Full fuel bypass. 1300cc Injector Dynamics.

If the Bosch throttle bodies are good enough for a turbo Harley they are good enough for a 588 Ferrari Turbo.
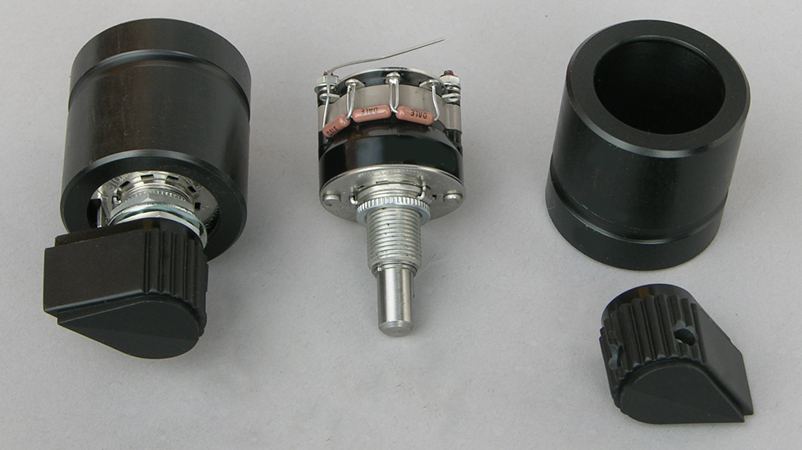
PPS (Pedal Position Sensor)
The OEM Harley fly-by-wire
throttle is a bit odd as it has a rest position, a wide open position
and a third forced shut position. The forced shut position changes the
voltage output about +/-0.75VDc on the two potentiometers. This is used
to activate and deactivate certain functions in the Harley Delphi ecm.
However, you do not want
the throttle blade to slam shut and kill the engine from the rest or
idle
position by forcing the twist grip further shut against the sprung
position. This can be programmed around with the SQ6M as it is flexible
enough to handle such a situation.
Pectel SQ6 AAR S&S Alligator Test Bike
Here's the smaller brother
of the SQ6M, the SQ6, on Dan Gurney's Alligator S&S TC engined
Alligator test bike. They have tried LINK G4 ecus as well as Motec. All
of the original Alligators used Pectel SQ6 systems. They were testing
Motecs after some bad dealings with Neel at Apex Speed Technology.
Then Dan Gurney passed away. Uncertain future for any Alligators....Ditto for the moment-cancelling twin he was developing.
There are no extras needed for the Pectel
systems whereas you have to purchase all sorts of add-ons for the
Motecs...things like $780.00 for a Dual Lambda Wideband controller or higher
level software licenses and DBW expansion boxes for FBW throttle
control. The Pectel
SQ6M has two NTK Wideband inputs standard as well as traction control
and FBW throttle control.
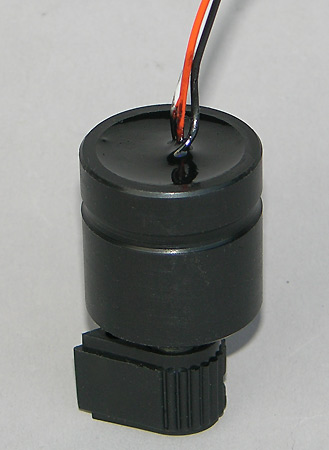
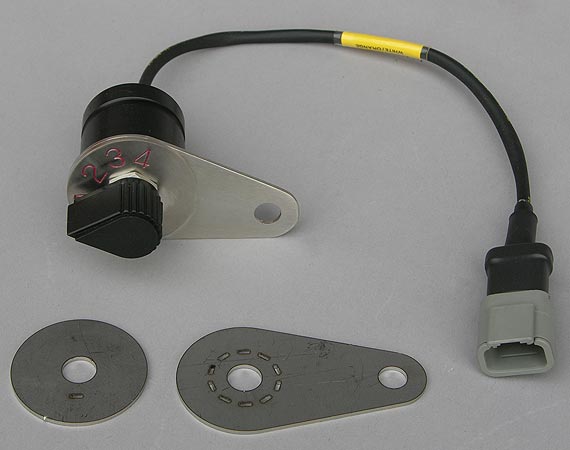
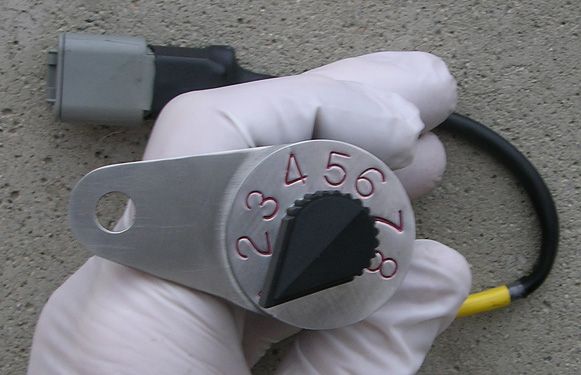
Knock Sensor
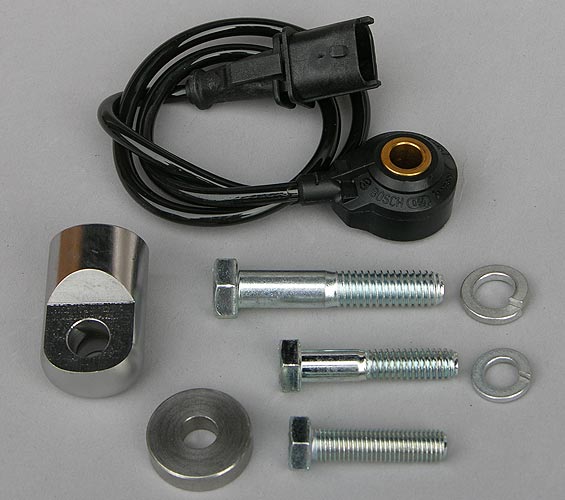
The Pectel SQ6M has inputs for two acoustic Knock Sensors. Shown is a mount kit for our ORCA Harley Motors...we only use one knock sensor on the V-Twin.
The Cosworth Pectel SQ6M starts at about $6,825.00 and you don't have to spend additional funds for data logging and other "needed features" as they are already built in. We step up from our own 40 pin ecu to this 107 pin unit. We aren't going to use all 107 pins on our pushrod v-twin, maybe 85 or so of them. Cosworth electronics are used on turbo Lamborghinis, Porsches, BMW's, Le Mans prototypes, drift cars, world rally cars, etc...and here we come along with pushrods and two lousy injectors. It's all racing.
You don't
have to spend
for a $4,000.00 Racepak data logger and sensors as the SQ6M does all of
that. You can log 4 Mb worth of dozens of channels at sample rates of
2000Hz (2000 measurements per second). In addition, you don't have to
spend $10,000 on a Motec by the
time you keep adding options and additional boxes. Thermocouples, wide
band NTK and knock sensor inputs, as well as sophisticated PID
functions are all standard.
On the
ignition side you
also do not have to purchase a clunky $1,100.00 MSD MC4. From the
ignition standpoint you can support a very sophisticated closed loop
knock sensing strategy without any additional boxes. Only one software
package to deal with instead of three.
The SQ6M has a few options but it really comes with everything you need like dual lambda control, fly by wire throttle, and a standard 4Mb of onboard data logging...Besides, it has those cute, sexy, expensive Deutsch Autosport connectors...so hard core.
Well, we
raced at LeMans
back in 1977 with carburetors and these days Cosworth and Bosch
electronics race there. Guess we might as well step up.
Cosworth
Engine
Control
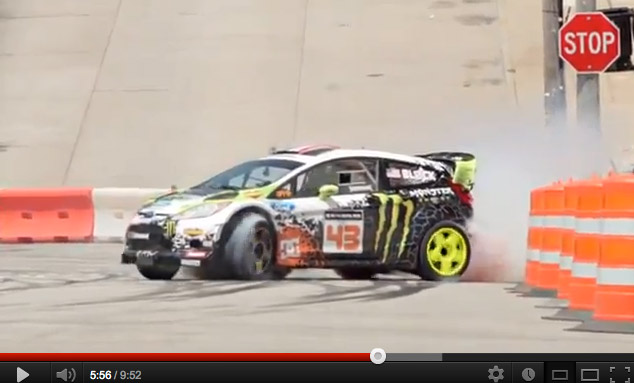
Cosworth
SQ6M series
engine controller doing
its thing with 650hp and Ken Block.
Traction Control
When you
have 300-360 hp on
tap it's a good idea to have full electronic control over traction.
We've added front and rear wheel speed sensors to the Road Toad. Our
advanced electronics ecu will monitor front and rear wheel speeds and
can adjust boost, timing and fuel in real time. Important when
wheelspin gets beyond certain parameters. Very useful at Bonneville
where a torque-based strategy is useful to find traction and keeps
speeds going upward where the conditions vary as you head down the
salt. Front end FPGA keeps track of the angle based computations...way
faster than "seat of pants".
Wheel
Speed Sensor for
SQ6M
When the rear wheel starts going way faster than the front wheel and we're losing traction and speed we can use algorithms to do something about it. Things learned on the Road Toad get transferred to the Bonneville Bullett.
Aircraft Circuit Breakers..Not Fuses
For the
Pectel SQ6M
portion
of the electronics we are using Aircraft circuit breakers that "pop up"
and are push to reset. A lot more expensive than fuses but these do not
"blow" and you can see the offending circuit immediately.
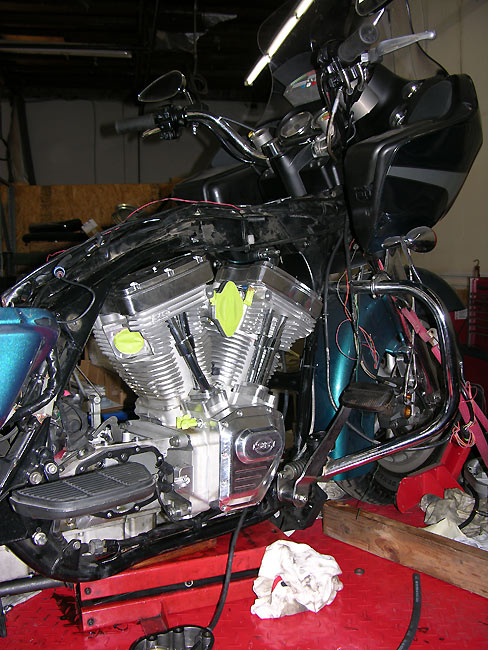
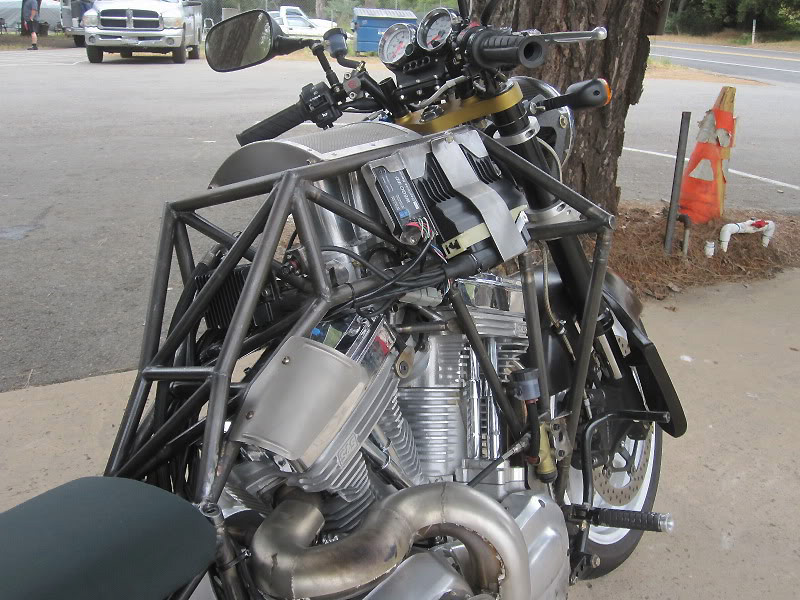
Installing the 126 in The Road Toad
Out comes the Twin Cam 88 and in goes the 126" Turbo Orca Motor. While we are at it we remove the transmission to have the gears back-cut. Portions of the OEM efi harness are removed as we are doing a Mil-Spec Harness for the Pectel SQ6 ECU. The stock Delphi ECM is left in place for fuctions like dashboard gauge operations.
After 10,000 miles of testing on the Twin Cam 88 the parts were inspected for wear and nothing was out of the ordinary. We will remove the fuel system from inside the gas tank as the OEM pump and regulator assembly cannot keep up with 360 hp worth of flow. We limited the TC88 Road Toad to 165 hp...keeping the boost low.
Initial Wiring Diagram
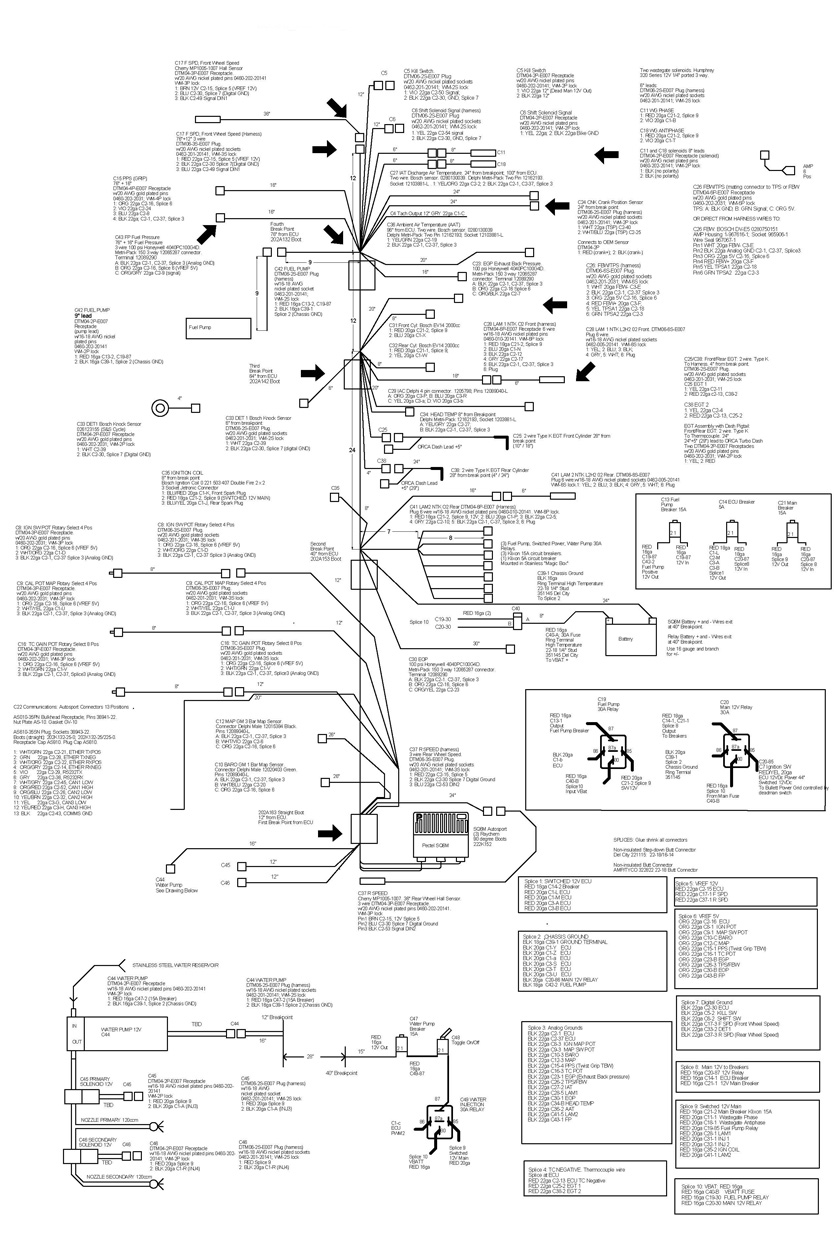
Next step is to prototype out the wiring harness to get lengths and break points for the various "runs" and sensor locations. A mixture of Deutsch DTM connectors and Delphi Weatherpack, and Deutsch Autosport connectors will be used.
We make an
initial drawing
of the wiring diagram but this will only aid in planning purposes. The
actual harness has to be constructed on the bike with all the hardware
in place. It is critical that there be no strain or interference issues
and that serviceability is planned for.
SQ6M Communcations
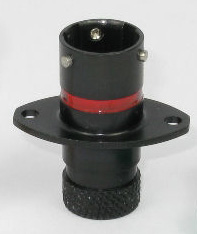
Ethernet,
serial, and CAN communications take up 13 pins of the Pectel ECU. The
best way to handle this is to use a Deutsch Autosport 13 pin connector.
We use a flanged AS010-35PN Bulkhead Receptacle on the motorcycle and
make a commo cable using the mating AS610-35SN Plug. Deutsch Autosport
caps seal the connectors and Raychem adhesive lined boots seal the 13
wires on the harness and the communications cable.
Fuel System Upgrade
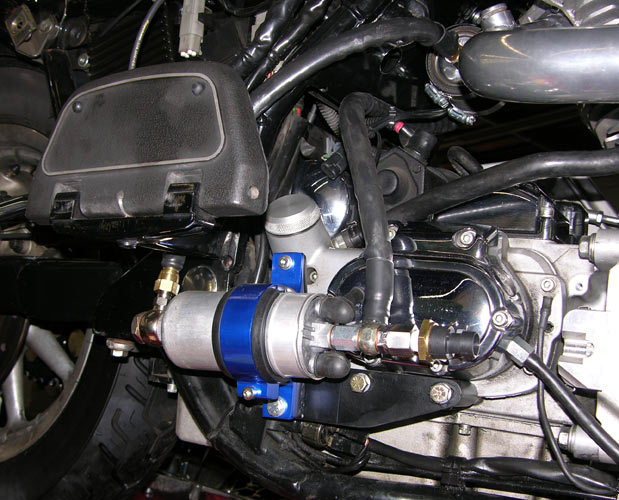
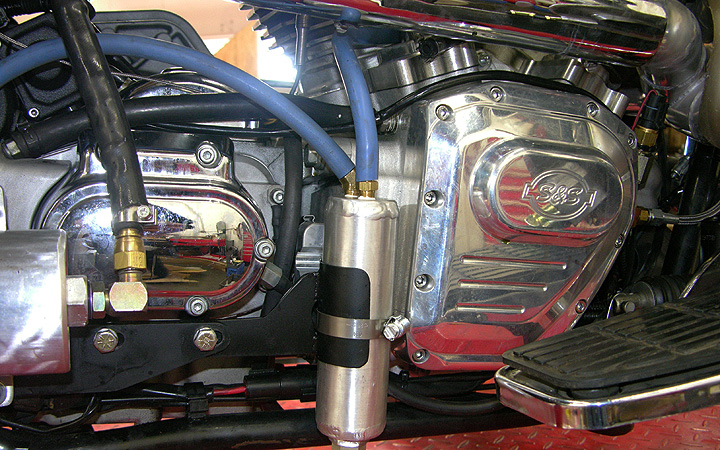
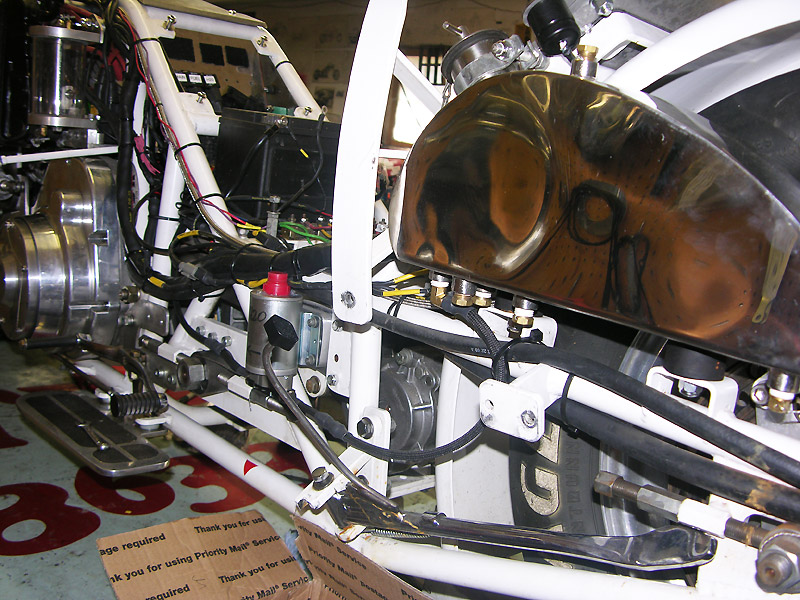
The stock in-tank pump and regulator simply will not suppport 360hp. We convert the Road Toad to an external 700 hp racing fuel pump, filter and regulator assembly. The gas tank is modified for a return or bypass port and all fuel lines are upgraded to 3/8". Rubber isolated components, laser cut mounting brackets, AN fittings and fiberglass sheathed fuel lines all make sure the 126 Turbo Orca will not run out of fuel.
We use a
0-100 psi pressure
transducer to
monitor fuel pressure.
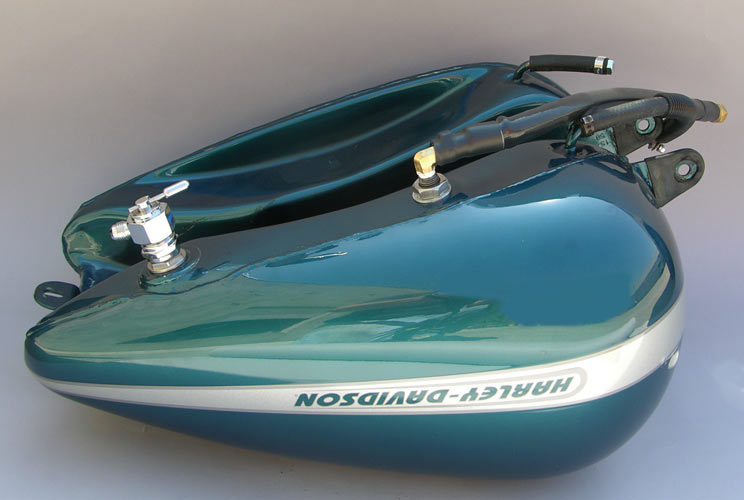
To make 360 horsepower you simply can't use the stock returnless (pump and regulator in the tank) oem system. We put a return port in the 2004 gas tank and install a high flow AN6 petcock for our 3/8" efi fuel lines. All the high pressure feed and low pressure return lines are sheathed in fiberglass for abrasion and heat resistance. We retain the FLTRI's in tank sending unit and back this up with an AN6 petcock that has a physical reserve position.
The regulator mounts on the left crash bar where we can make easy adjustments to fuel pressure. A 0-100 psi pressure transducer monitors the fuel pressure, feeding the data to the Pectel SQ6M. We also monitor engine oil pressure and exhaust gas back pressure in the turbo exhaust manifold. Programming safeguards into the ECU logic can avert damage from system failures. We also monitor real time EGT and O2 values for each cylinder.
Bonneville Bullett Upgrades

Here we are
adding an
exhaust backpressure compensation port to the Bonneville bike's
stainless merge collector. The ceramic coating takes a beating with the
1600 Deg F exhaust gas temperatures. The SQ6 will monitor exhaust
pressures for wideband O2 compensations.
As long as we were at it we added the same port to our spare Bonneville Bullett stainless turbo manifold.
The turbo manifold is plumbed for the 0-100 psi backpressure sensor. High temperature stainless tube and flexible high temp wire tubing allows for engine movement. This is a long way from our very early 1980 Shovelhead turbos.
![]()
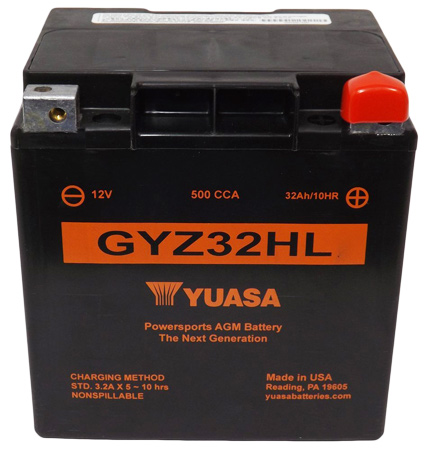
Since
we do a lot of road work we upgraded the Road Toad's starter to a
Compufire starter. Going from a Twin Cam 88 to a 126 Orca motor
requires more Kw of cranking power. Compufire has been starting and
charging Mike Geokan's Bonneville Bullet reliably so we wanted the same
gear on the Road Toad.
Testing the 126 Turbo
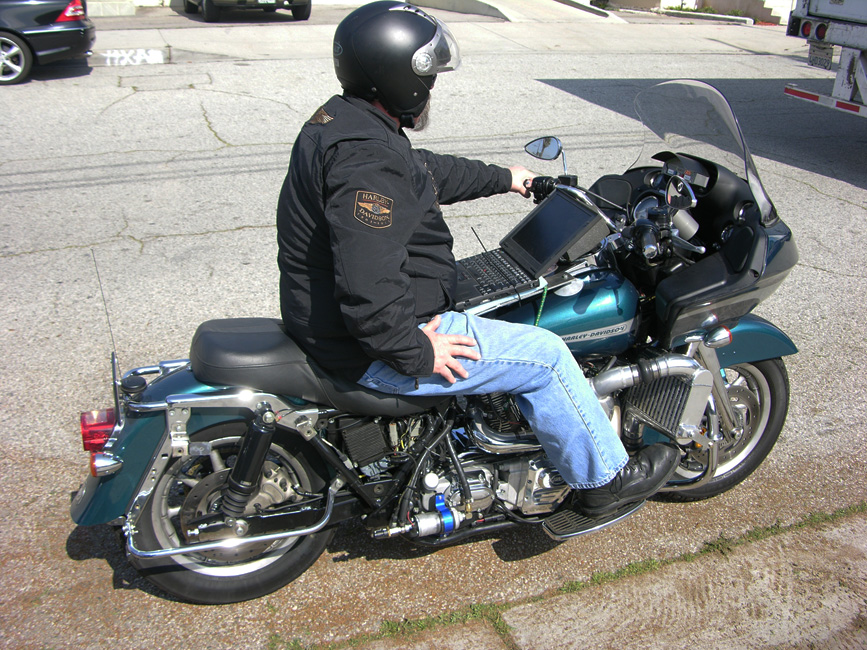
We
have an eddy current load dyno but we ride. Riding and dynos are not
the same. Besides you
can't screw around with people when you ride a dyno. Testing the 126
Orca Turbo. Miles...miles miles. Not dyno miles. We do minor edits with
the computer and monitor egts and air fuel ratios. Ron K has enough
experience not to hurt anything.
We let a lot of people drive the Twin Cam 88 turbo...not so with the 126 as it gets serious fast and there is a lot of time and money tied up in it. Necessary preparation for upgrading the Bullett to a Cosworth Pectel SQ6M engine management system. You don't go to Bonneville to test.
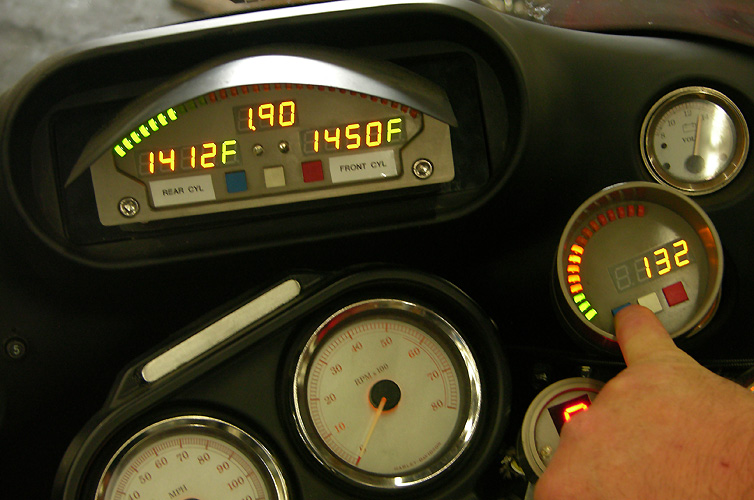
We put on our RSR EFi to sort out mechanical issues and break in the engine. We limited the intial break-in to 200+ hp, 200+ ft lbs torque @5500 rpm. The engine will wind past 7000 rpm but we set the rev limiter to 6500 and shift well before this. 209 hp at 12 psi boost and well below peak rpm is enough to leave any bike in your rear view mirrors. Roll-ons in 4th gear @ 2500 rpm fry the tire. 80+ mph cruise under closed loop @ 2700 rpm with the taller gearing. 1.9 Bar is 13.5 PSI of boost and way past 200 hp...132 mph on ORCA GPS Speedo in 4th gear. Does get interesting...EGTs are OK.
A
friend of ours loaned us another bike for prototyping so we let him
ride the Road Toad...something we are normally reluctant to do. We sent
out a companion rider on a SE120R engined Road Glide to follow him. One
roll-on in 3rd gear and the the customer pulled over and got off the
bike. It was a bit too much for him. They switched bikes and the
customer rode the tamer SE120R back. It is a serious piece of equipment
at 13 psi. At 25 psi there's another 100 hp on tap.
Next up, tear it apart and check everything after 1000+
miles and wire up the 107 pin Pectel SQ6M.
Breathers
Testing the 126 with catch can for upper end breathers. We run low boost without the hoses to check for f/r head breather issues. For higher boost testing, once we are assured there are no issues, we hook up the catch can breather system with a vent tube. You do not want to pressurize the upper end of the engine. After dyno tests up to 12 psi and 1000 miles there was only some condensation in the catch bottle. The 126 Orca remains tight with no blowby or leaks.
Road Toad Air Shifter

Our
Bonneville bike has an air shifter so we setup our Road Toad to mimic
the Bonneville Bullett. This allows us to test the SQ6M programming for
both up and downshifts. Air lines and electrical connectors are quick
disconnect.
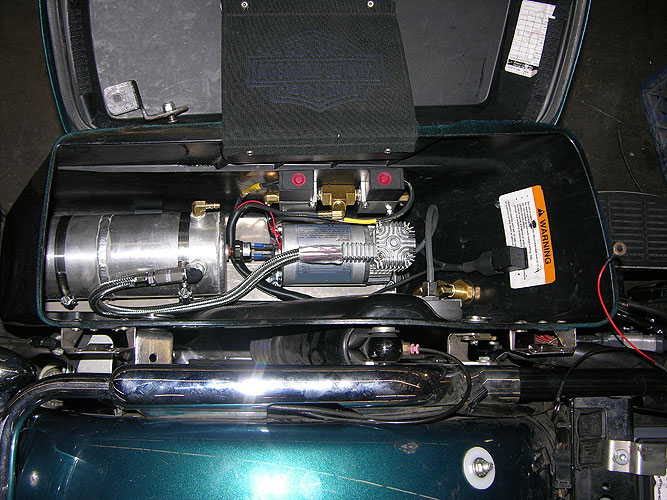
We
installed the compressor, accumulator, solenoids and relay in the left
saddlebag. No air bottles to fill and the stored energy allows for many
shifts before the compressor kicks back in. We nixed solenoid shifters
as they put a 30-40 amp momentary load on things and they are way
slower than air shifting. We can adjust pressures on an air shifter but
an electric solenoid shifter is a fixed equation.
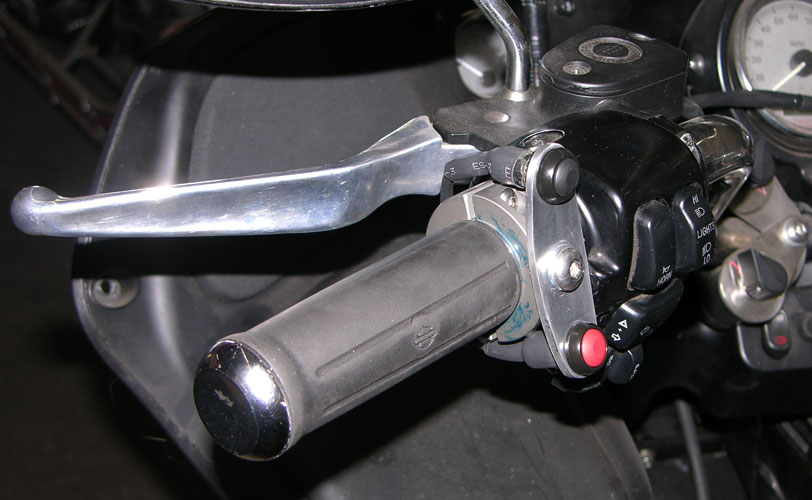
Waterproof momentary upshift and downshift buttons with Raychem sealing...ES2000 and DR-25. Billet handlebar clamp. Black for upshift. Red for downshift. Use your toe to get neutral. We have a digital gear indicator installed. The Bonneville bike needs an up/down shifter as Bryan Stock has his hands full at over 200 mph in both acceleration and shutting down at the end of the run. It's easier to test the functions on a street bike.
Road Toad Crash Bar Oil Cooler

Crash Bar Oil Cooler: Old trick...Just updated a bit... Routing the oil through the crash bar. We added two machined finned structures to shed more heat. They are directly in the oncoming airstream. We are looking for a 30+ degree drop in peak temperatures.
Left
side view: 1/4" Stainless pipe nipples welded to crash bar and
3/8" hose to and from Jagg oil filter adaptor. This adds about a
quart of oil to the system. We run Brad Penn Oil, the "Green Stuff" exclusively and have since the 1970's.
On a Funny Note
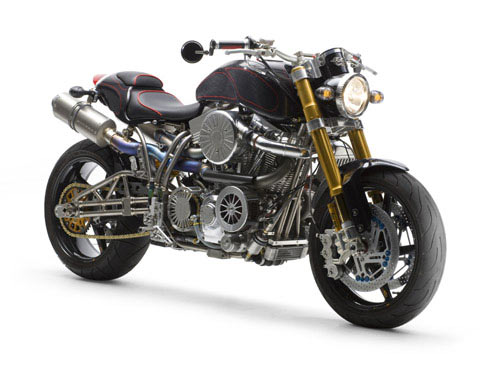
We've been at this turbo big twin thing for a long time. If you have $275,000.00 laying around you can buy this thingy pictured above with a supercharger and 200hp. We prefer to zoot around on Road Glides with a lot more power...and a windshield. 200 hp! Shit, we were making 275 hp over 20 years ago.
Bonneville Bullett: Final Wiring Pectel SQ6M
The Bullett had to be completly revised for the SQ6M installation. The new Fly-By-Wire Throttle control required the fabrication of a completely new inlet system for the Bosch DV5-E5 60mm throttle body. As "a is always connected to b" this also required the fabrication of a new plenum chamber deleting the idle air control motor and bypass air port as well as installing a myriad of new sensors. It does get complicated. You can't get a catalog and order up the parts.
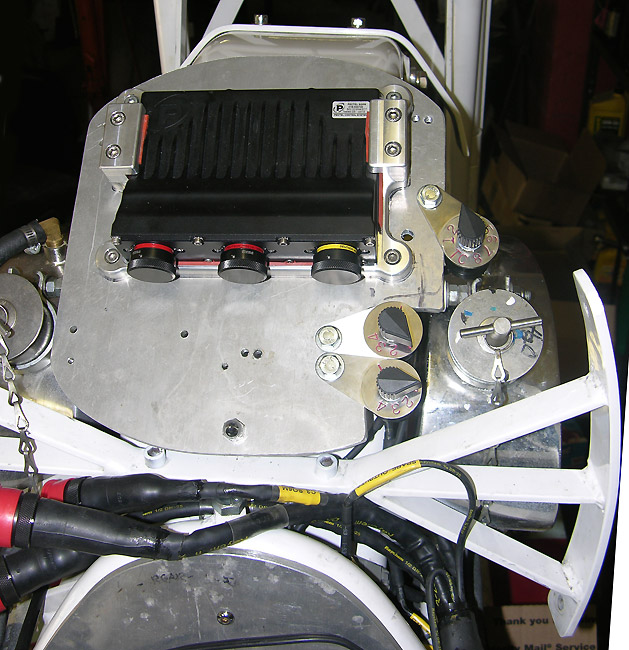
Map selection knobs for traction control, fuel and spark are mounted behind the seat. Bryan has no time to take his hands off the bars at over 200MPH on a 1000 lb bike..So we made them easily accessible , even on the start line if we decide to make a change.The SQ6M sits in its new billet mount bolted directly to an aluminum bulkhead plate that is rubber-isolated from the main frame. The two stainless saddle tanks are for oil (Brad Penn) and water for the water injection system.
Road Toad's 1300CC Injector Dynamics Injectors
New ID 1300cc Injectors from Tony Palo at T1 Race Developments for the Road Toad 126. These are the latest and greatest of the cooperation between Paul Yaw and Tony Palo and Bosch Motorsports. These replace our ID2000cc injectors that we use in the Bonneville Bullett. They feature all stainless internals and are compatible with all known fuels. 1340cc/min @ 3.0 Bar. The newest addition are the 1700cc Injector Dynamic Injectors also made in conjunction with Bosch Motorsports.
The ID2000 Injectors we use in the Bullett use a didfferent injector connector: A Nippon / Denso Style Female Type A2 Top Slot Fuel Injector Connector.
Wires Wires Wires
Since there are 49 outboard connectors from the main SQ6M wiring harness the wiring does get complicated. In addition there are all the wires from our Orca Turbo Dash, Orca GPS Speedometer, Orca Tachometer, and Bonneville Gear Indicator to complicate the matters. Before on the left and after on the right...5 days later.
Magic Box
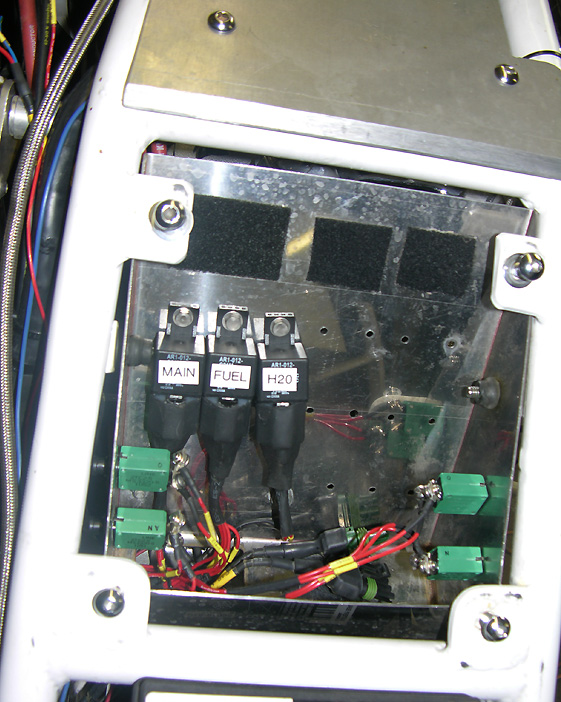
In front of Bryan Stock's crotch is an aluminum plate hiding Mike Geikan's "Magic Box" that he fabricated out of stainless steel. In it we installed the three 30A relays and four Klixon Circuit Breakers. We labeled the circuit breakers on the outside edges of the box for easy visual access. Our one bar and three bar map sensors are also located in the box.
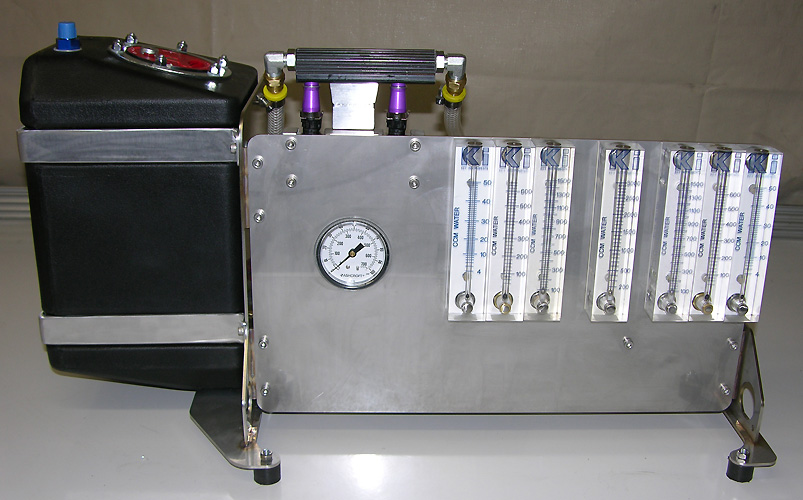
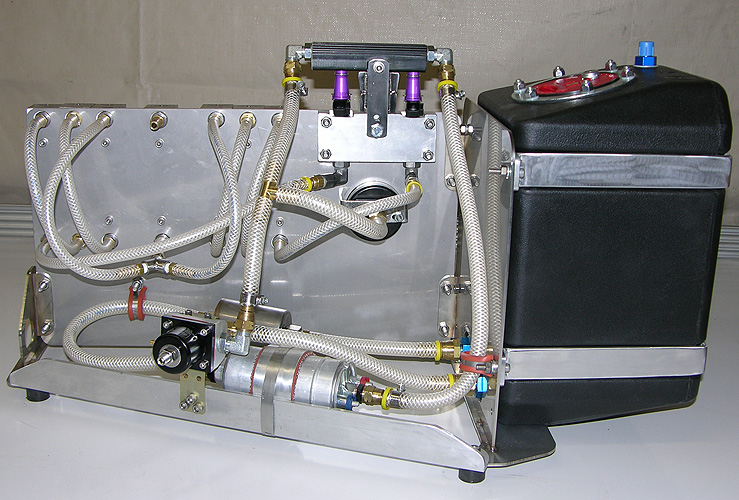
Water Injection
The water injection system is controlled by the SQ6M via a separate relay and Pectel CalTool programming. The Bullett has a stainless water injection tank and a 1000psi water injection pump on the left side of the bike. A single nozzle is located in the Bullett's inlet manifold behind the Bosch fly-by-wire throttle body.
Exhaust Back Pressure
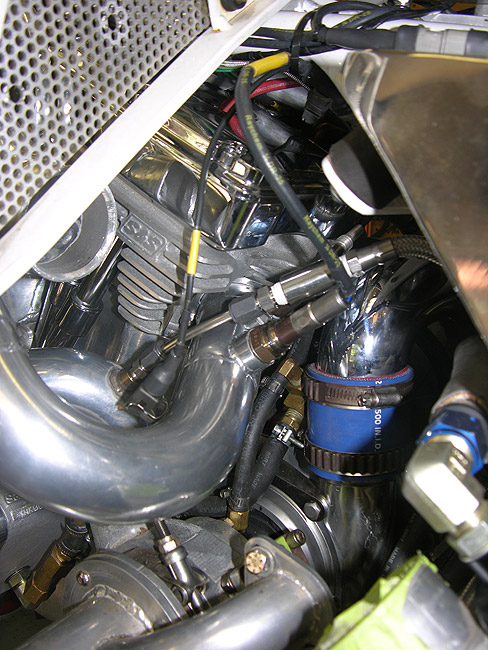
We measure exhaust back pressure just before the turbo after the merge collector. Stainless fittings, stainless tube and all stainless hose snake over to a pressure transducer that the SQ6M monitors for pressure compensation of the NTK/NGK L2H2 Lambda Sensors.
NTK L2H2 Lambda Test Stand Calibration
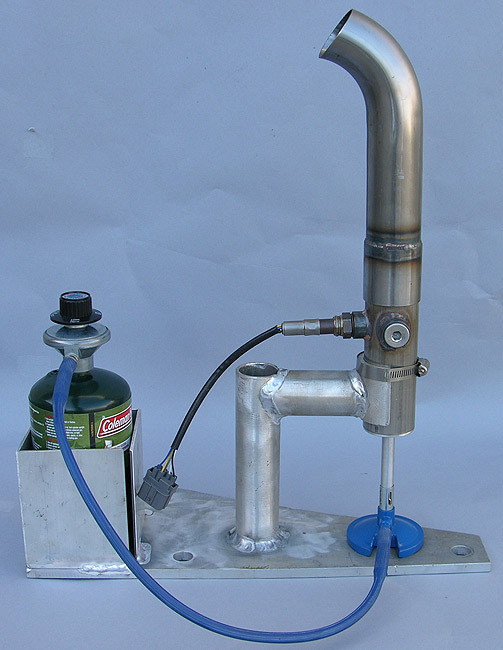
NTK L2H2 Test Stand for sensor linearization: Propane
with a variable air bleed and three 18mm x 1.5 ports. Used for calibrating two NTK L2H2 Lambda meters
against a known calibrated meter. Flowing Nitrogen gives Lambda 1.0
(14.57:1 AFR). Free Air at one end of the scale and propane/air mixtures for richer
points. Pectel SQ6M engine controllers have 33 points to linearize or calibrate for
each of the two NTK sensors. The SQ6M has internal NTK amplifier and heater circuits, so no
external devices are required. Alternatively you can purchase a
$1,200.00 drum of test gasoline and a $1,200.00 bottle of Lambda
calibration gas to do your testing.
Wastegate Phase-Antiphase
The
Pectel SQ6M controls the wastegate via these two solenoids which are
connected to the upper and lower sides of the wastegate's diaphragm.
Boost can be programmed in a number of fashions linked to gear
position, speed, traction control, and the like. It does get
complicated. Inlet Air Temperature (IAT) is monitored post intercooler
and Ambient Air Temperature (AAT) is monitored at the inlet of the
turbocharger. Pectel CalTool 3.6 is used to program the Phase-Antiphase Boost Control.
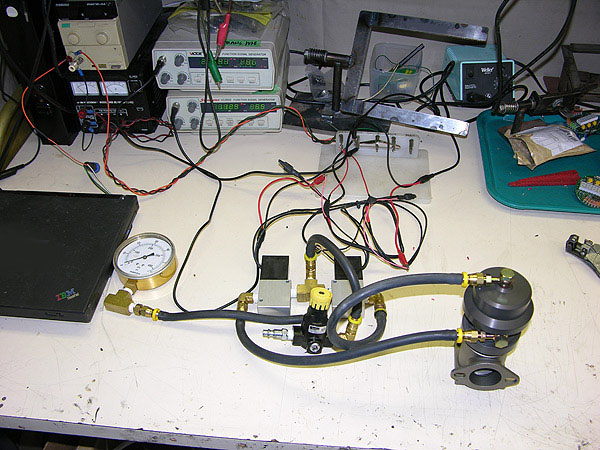
Bench testing the wastegate and the phase anti-phase solenoids with two function generators.
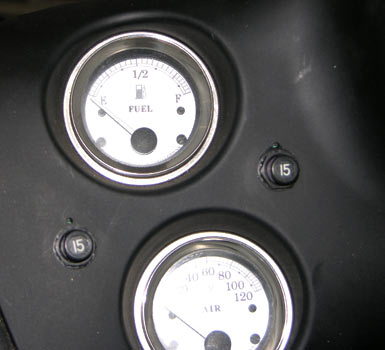
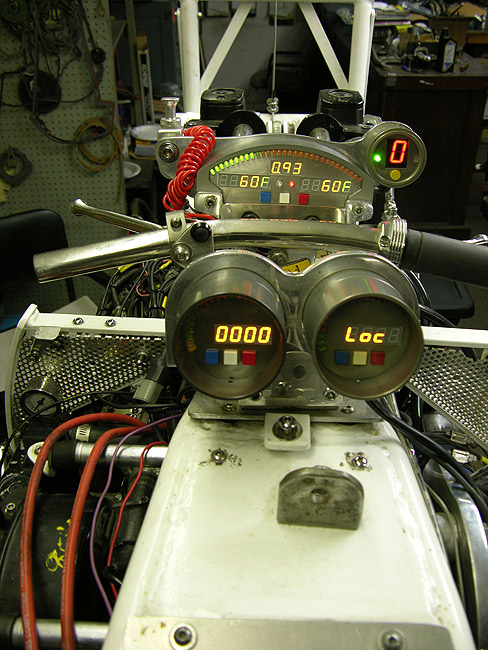
Instruments
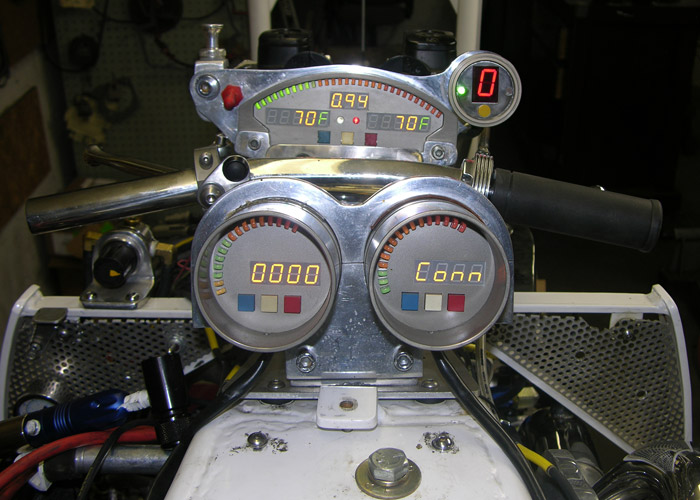
Tach left, GPS lower right. Orca Dash showing EGTs, manifold pressure and oil warning center top. Upper right is gear position indicator with the l.e.d. green light illuminated in neutral and 5th gear.
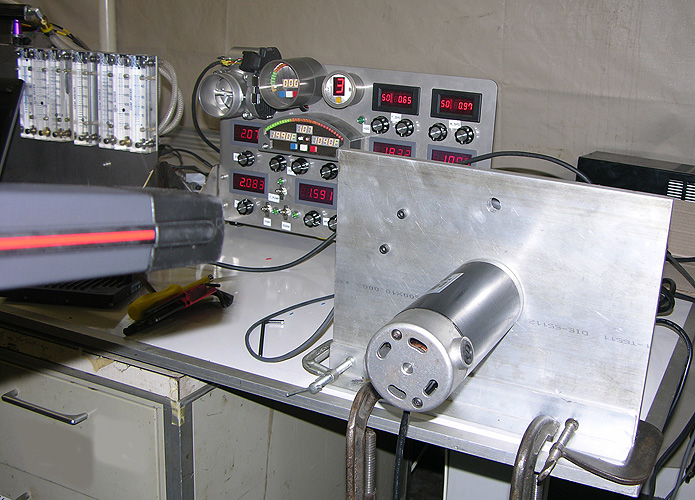
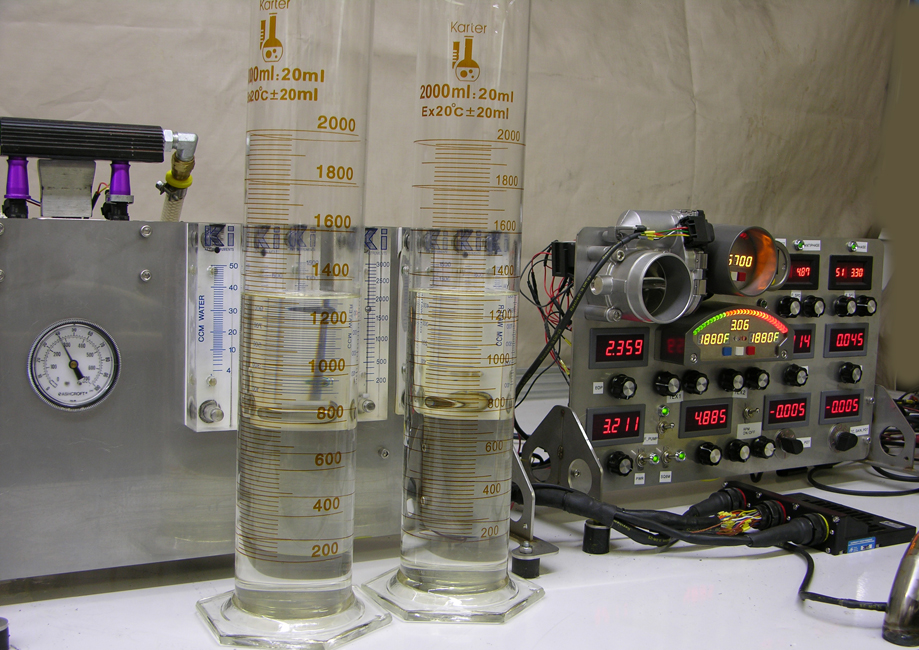
How do you test a Pectel SQ6M before you go to Bonneville
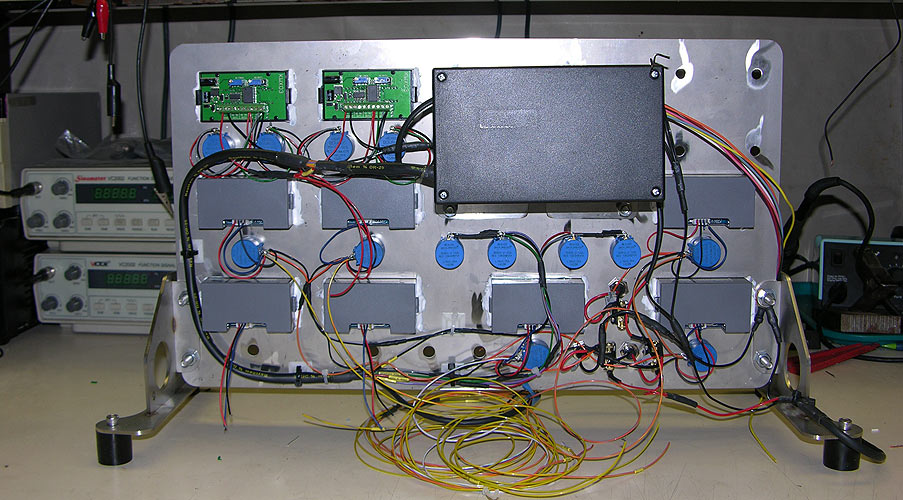
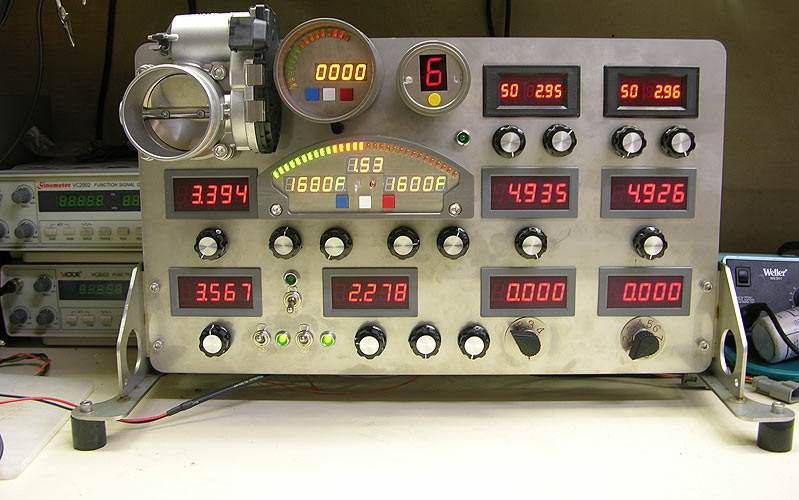
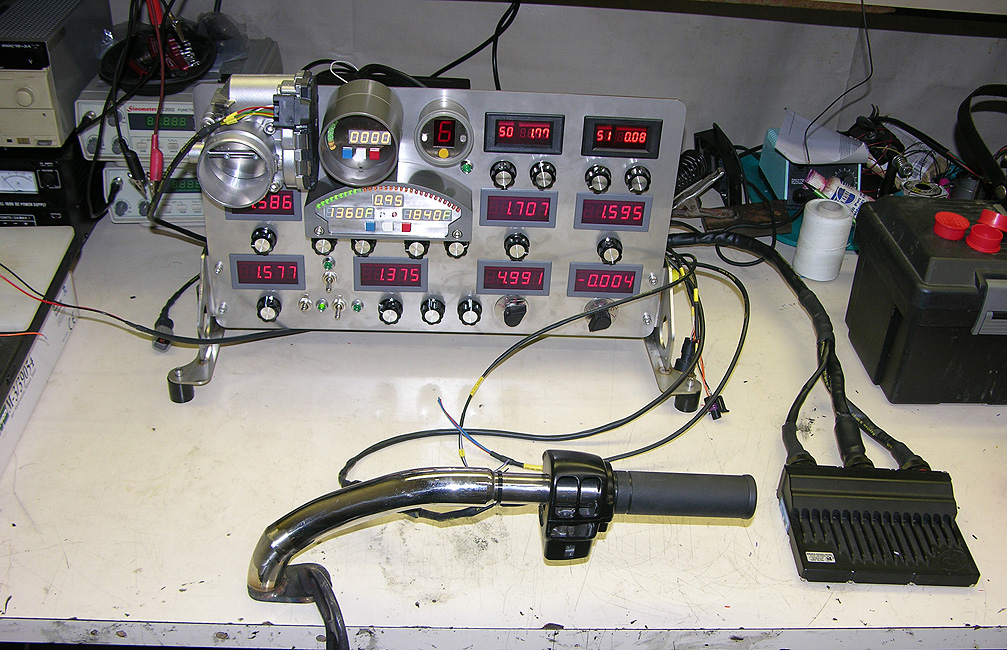
Well,
you build a SQ6M Simulator which allows you to test Pectel Caltool
programmed functions.
When you get to the Salt Flats it's too late to see if things work.
With about 8800 software entries and tens of thousands of keystrokes
it's probably a good idea to run some simulations.
All inputs are simulated including: map switching, traction control
switching, front and rear wheel
speeds, engine oil pressure, fuel pressure, 3 Bar MAP sensor, inlet air
temperature, engine temperature as well as dual thermocouples. Laser
cut stainless steel panels.
Fuel pump output to flow injectors on separate flowmeters. Digital gear
indicator and Bosch DV5-E5 60mm FBW throttle body. L.E.D.s for panel
power, SQ6M power, external fuel pump and water injection activation.
Pectel SQ6M firmware times out the FBW motors if the engine is not
running after 1 minute. The SQ6M Simulator allows us to "run" the motor
and work on PID functions and programming of the 167 FBW categories.

A simple toggle switch activates the flowbench portion by connecting the SQ6M fuel pump relay to the 044 Bosch pump.


Speed Costs
In
case you
are wondering
what all this go fast shit costs...Here's something to ponder. Road
Toad: Used
FLTRI $10,000.00 to $12,000.00. Base 360HP Turbo System $8,995.00.
Advanced Electronics, including traction control, data acquisition, and
Mil Spec wiring harness, 75 outboard sensor and I/O functions, plus
tuning $20,000.00. Race prepared 126"
S&S SA 126" Turbo engine $15,000.00. Then there's the race clutch,
hydraulic master cylinder conversion, chain final drive swingarm
conversion, and all that
installation labor.
In
Mike Geokan's case the Bullett has chewed up 22
years of building and dreaming and every piece was custom made. RB
Racing left this project in 2017..We got tired of spending money on a
project where no one wanted to do any testing and some very stupid
ideas based on a rose colored view of the past were not going to be
changed. If you don't test and let the bike sit year to year waiting
for RB Racing to do it all and just show up for the racing
experience...Well, that is no recipe for success.We left having taken
it from a rusty frame to a soft 200 mph record in just three years
after the front wheel turned for the first time...With zero testing.
Sort of a bargain compared to the days of "Master Builder Chopper Mania". You can actually ride one of these things anywhere...faster and for less money than the guy with the attitude and tatoos was charging. Speed and practicality never go out of fashion.
What we learn
at Bonneville
goes into our street turbos...And the things we develop to press the
envelope in our Road Toad goes into our Bonneville racing like the
Bonneville Bullett above. Expensive, but
necessary.